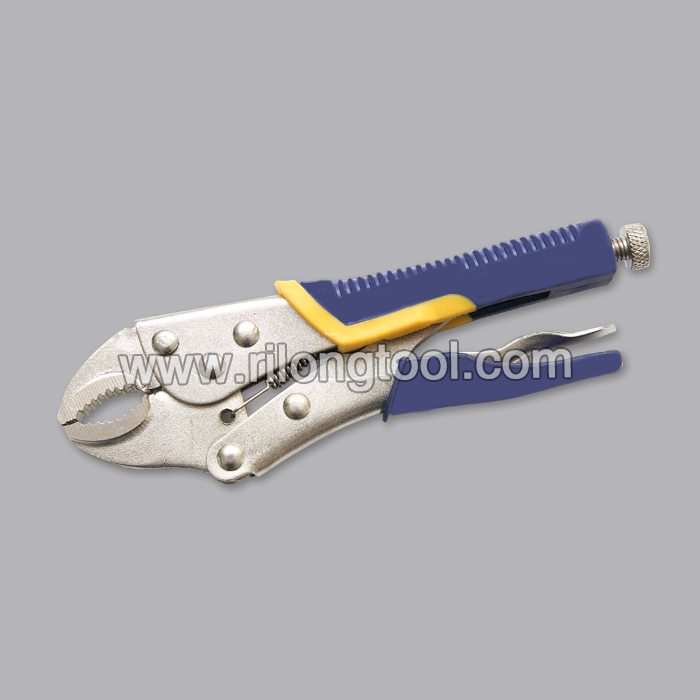
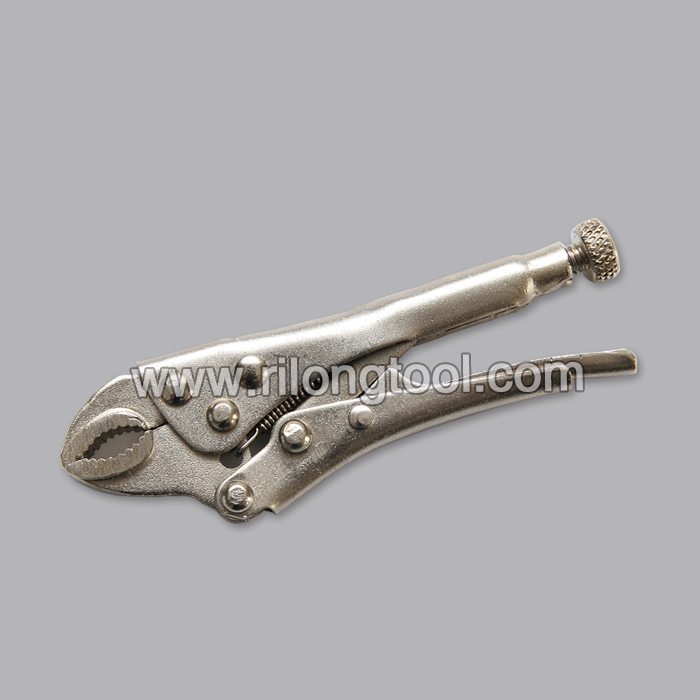
Competitive Price for 5″ Forehand Round-Jaw Locking Pliers Sacramento Manufacturers

Short Description:
Product Detail
Product Tags
We always work as a tangible team to ensure that we can provide you with the best quality and the best price for Competitive Price for 5″ Forehand Round-Jaw Locking Pliers Sacramento Manufacturers, winning customers' trust is the gold key to our success! If you are interested in our products, please feel free to visit our web site or contact us.
Basic Information
■Model Number: RL-DLQ001
Additional Information
■Material: A3# steel (Q235) or 45# steel
■Size: 5”
■Surface Treatment: Nickel-plated, Zinc-plated, Black Oxide, Electrophoresis
■Heat Treatment: Optional
■Package: Blister Card, Suction Card, Tie Card, Double Blister Card
■OEM: Acceptable
■HS Code: 8203200000
■Samples: For FREE
■Delivery Time: Always 30 working days depending on the order quantity
■Packing: By standard cartons
Product Description
■Mainly used for clamping parts to rivet, weld, grind and so on, which is characterized by the powerful clamp force produced by the jaw. It can lock tight so that the parts won’t fetch away. Besides, jaws have a lot of levels to adjust for the use of different thickness of parts, and it also can be used as a wrench.
■Flexible using, long life and good tenacity.
■The screw tuning button can give the best clamp size easily.
Product Image
I’ve been super excited about the new SOG Baton multitools. Here’s my review of the Q1.
https://amzn.to/2uwKiRz
Help us out by buying from this link. I mean why not? It’ll really help us to keep making videos.
Table of Contents
0:10 Introduction
4:30 Start Project – cutting parts to workable sizes. I cross cut the lengths into sizes around 12″ -18″ long, so that I can get two finished parts out of each stock. There will be some wasted wood in the middle, but this is to increase the safety of handling small parts around machine tools.
10:44 Drilling the wheel wells on the drill press.
15:55 Cutting the slots for the axle assemblies. A test piece will be needed to get the proper fit which is just a little loose but not snug. Minimizing the play in the axle will enable the vehicle run straight.
19:36 Final dimensioning of the thickness.
20:23 Cutting a large slot in the truck bodies. I start with the table saw (not bothering to set up the dado blade, which could do the task in two passes) then I make a finished clean cut with a straight bit on the router table.
21:48 Making thin rips for the car chassis. There are other ways to make thin rips. The method I show here only works with a zero clearance table saw insert and a push stick of similar design. The cut I am making is 3/64″.
23:18 Angle cuts on the table saw.
24:46 Edge sanding with the 220 grit belt. Tip – the only way I can start with 220 grit is if most of the surfaces are smoothed on the jointer or planer – a table saw cut surface is too rough for 220 grit to work effectively, and in that case stepping down to 150 grit first is best. But like I said in the video, I did extra milling on the jointer after each table saw cut to eliminate the rough sanding – and this does save time. 180 grit belt would also work for a finish sand, and may even work better than 220 grit if it’s less burny on the cherry.
29:02 Cutting the final dimension. As you can see, the order of operation technique here is to do as many of the steps as possible, including finish sanding, before the parts get very small. Note – I am putting my fingers fairly close to the blade here… I would not recommend this unless you are a professional and very comfortable with your saw. If I had to do these all day, I would definitely install a toggle clamp onto the sled for the smaller parts.
30:53 Final sanding on the edge sander
32:29 Hand sanding with a block of 220 grit PSA. The burn marks come off fairly easily with hand sanding.
34:12 Axle and Wheel assembly. I find that a tiny pair of vise grips works very good here. ***IMPORTANT NOTE: I have noticed that the smaller 5/8″ wheels can sometimes have a manufacturing defect and the washer embedded in the rubber can be out of alignment. This makes the wheel run off center and not as smooth. So… to combat this potential problem I have included 4 extra rubbers. However, you will not be able to tell which tires have the defect until you assemble them onto the axle. Before gluing the axle assembly into the car permanently, test the wheels first by simply rolling them with your fingers. If it wobbles, replace the wheel with the included spare tires.
37:32 Glue ups. Tip – Having the right glue applicator is key to not making a mess with the glue.
41:24 Finishing – I am using mineral oil. Dip it and Done. makes it run better too.
42:12 Completion.