Short Lead Time for 5-PCS Hex Key Sets packaged by spring ring for Boston Manufacturer
Short Description:
Product Detail
Product Tags
Our target is to consolidate and improve the quality and service of existing products, meanwhile constantly develop new products to meet different customers' demands for Short Lead Time for 5-PCS Hex Key Sets packaged by spring ring for Boston Manufacturer, It is our great honor to meet your demands.We sincerely hope we can cooperate with you in the near future.
Basic Information
■Model Number: RL-NLJ001
Additional Information
■Material: 45# Carbon Steel
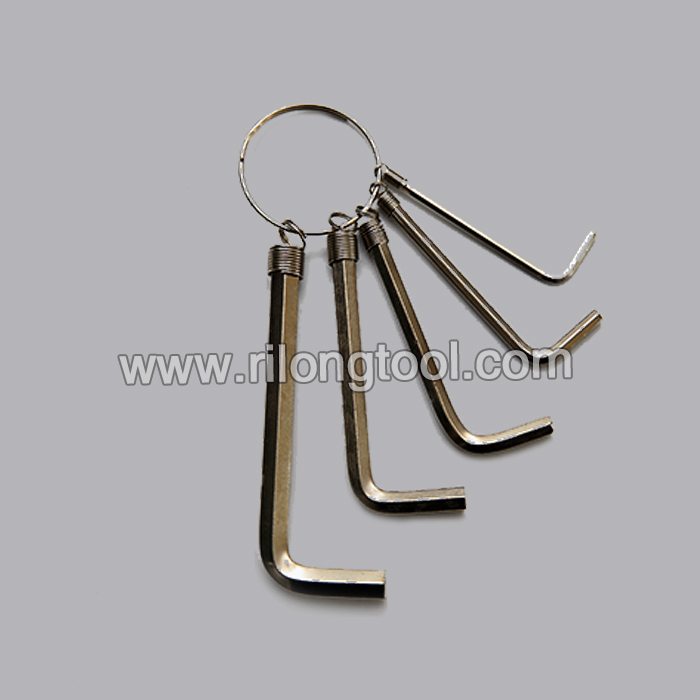
■Size: 1/16″-3/8″, 1.5mm-10mm
■Surface Treatment: Zinc-plated, Black Oxide
■Heat Treatment: Optional
■Package: Spring Ring + Suction Card
■OEM: Acceptable
■HS Code: 8204110000
■Samples: For FREE
■Delivery Time: Always 30 working days depending on the order quantity
■Packing: By standard cartons
Product Description
■Ningbo Rilong Hardware Tools Factory can provide various kinds of Hex Key with different sizes and packages.
Product Image
Low Side Suction hose replacement.
Follow-up here: https://youtu.be/JQMcvWwo-3U (also check the video responses)
10:38 — the O-ring on the compressor is called a slim line seal washer. You only use suction side slim line seal washers as a replacement.
Additionally, there is a separate part number if you’re attempting this repair on a 1999-2002 S-series… this is it: 21031289
11:10 — Obviously you would want to re-attach your air intake tubing, air resonator, and air box/filter before taking off…
To clear some misinformation: some home A/C units in fact DON’T use R-134a… the newest one I bought uses R-410a… however the fridge DOES use R-134a.
***TOOLS NEEDED***
* 1/4″ drive ratchet
* vice grips
* 10mm sockets (regular and deep well)
* 3″ extension
* R-12 mineral oil (for lubing the new O-ring on the thermal expansion valve side; FJC part #2468 works well for this)
* rolled napkins/rags to plug the holes where the hose fits onto until you get the new hose prepped and screwed in
***Mechanic’s Safety/Troubleshooting tips when working on the A/C system***
1. A good majority (about 98-99%) of A/C malfunctions/gremlins are related to a leak or multiple leaks in the system. Unlike your home A/C unit, refridgerator, etc an automotive A/C system is always put to the hard test, every day. Conditions include but are not limited to: collision damage, vibrations, road noise, underhood temperatures that constantly change like Owe-Higho weather, etc. Over the years these and other conditions cause your parts to wear out, which means the proper parts will have to be replaced in order to restore your A/C functionality.
2. Always have a professional technician service/diagnose your A/C system. The techs have the know-how, tools, and machines to properly diagnose/service your A/C system, including but not limited to: System evacuation, vacuum holding, pressure testing, leak detection, and if everything’s good to go, a recharge.
HOWEVER, you can save some diagnostic time by looking for evidence of leaks. Usually, traces of UV dye and/or refridgerant oil will be left where the leak(s) happened. Start at the compressor, then the condenser, hoses, lines, receiver/dryer, thermal expansion valve, oriface tubes, etc.
3. ALWAYS work on a discharged system. Refridgerant is cold to the touch and can cause personal injury. If you’re dumb enough to put it in your face (or someone else’s), you can put an eye out.
4. Work on a cold engine (think ambient air temperature). I’m sure you don’t wanna get burned working in tight places, etc.
5. If you’re working on multiple A/C parts, repair each part one at a time. Due to the way A/C flows and the design of parts, etc. this’ll save confusion and tail chasing later on. Mixing parts and hoses can cause costly repairs later, if not an improperly working A/C system.
Remember, Safety, Proper troubleshooting, Proper diagnosis, and doing the job right the first time are all #1.
Quick how to tip for removing staples from hardwood floors. This doesn’t work on all types of staples and some of the time, I have to use the pliers to pull them up and it is way more time-consuming. Wearing thin leather gloves helps it not hurt your hands so bad. Hopefully you have the “easy” staples like in the video and good luck with your project! ![]()