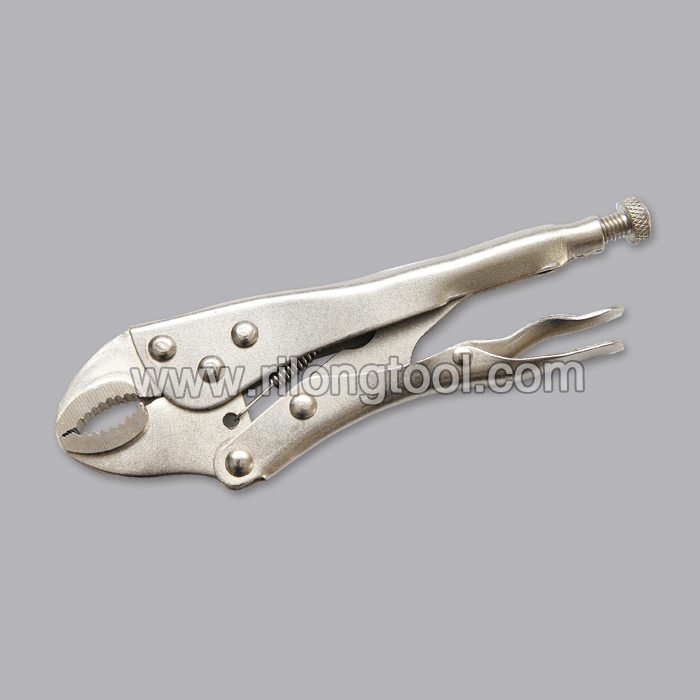
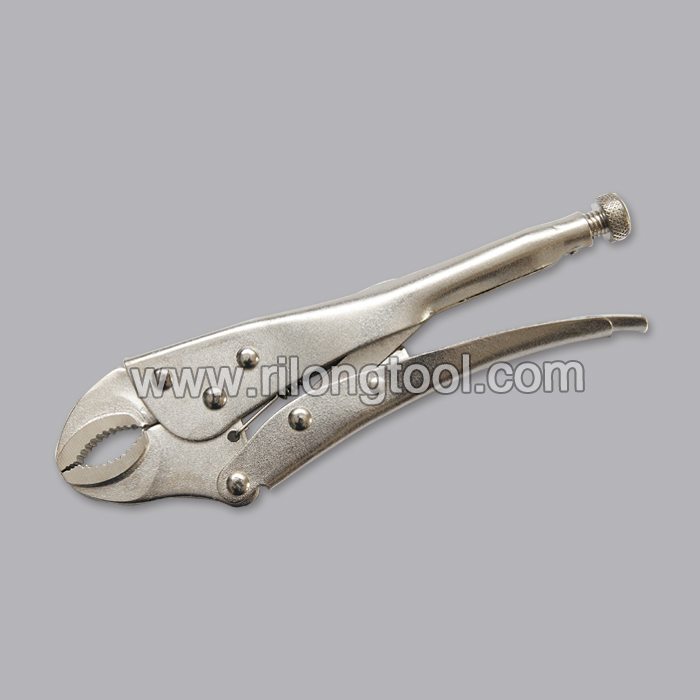
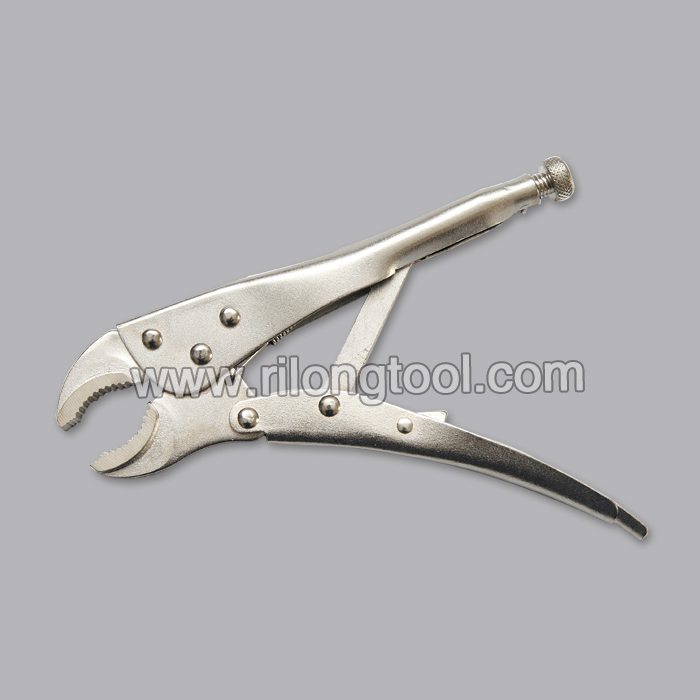
Professional Design 10″ Forehand Round-Jaw Locking Pliers to Norwegian Manufacturers
Short Description:
Product Detail
Product Tags
The very rich projects management experiences and one to one service model make the high importance of business communication and our easy understanding of your expectations for Professional Design 10″ Forehand Round-Jaw Locking Pliers to Norwegian Manufacturers, We are sincere and open. We look forward to your visit and establishing trustworthy and long-term standing relationship.
Basic Information
■Model Number: RL-DLQ005
Additional Information
■Material: A3# steel (Q235) or 45# steel
■Size: 10”
■Surface Treatment: Nickel-plated, Zinc-plated, Black Oxide, Electrophoresis
■Heat Treatment: Optional
■Package: Blister Card, Suction Card, Tie Card, Double Blister Card
■OEM: Acceptable
■HS Code: 8203200000
■Samples: For FREE
■Delivery Time: Always 30 working days depending on the order quantity
■Packing: By standard cartons
Product Description
■Mainly used for clamping parts to rivet, weld, grind and so on, which is characterized by the powerful clamp force produced by the jaw. It can lock tight so that the parts won’t fetch away. Besides, jaws have a lot of levels to adjust for the use of different thickness of parts, and it also can be used as a wrench.
■Flexible using, long life and good tenacity.
■The screw tuning button can give the best clamp size easily.
Product Image
These toilets require water pressure between 20 and 80 pounds per square inch (some up to 125 psi) to function properly. If your pressure is too low, check for a clogged whole-house filter element, faulty pressure-reducing valve in the main water line, mineral deposits in a primary or supply valve, or a clogged supply line or inlet screen. Pipes clogged by rust or minerals may require replacement.
Prestart Checklist
Time
2 to 3 minutes to perform any given check; repair time varies with repair
Tools
Slip-joint pliers, adjustable wrench, bucket, paper clip, toothbrush, screwdriver
Skills
Dismantling and reinstalling various toilet parts
Prep
Shut off water when necessary
Materials
Repair parts
Cleaning the Supply Assembly Screen Supply assembly Enlarge Image
Turn the water off and set a bucket under the supply assembly connection. Remove the supply line from the tank and pull up the assembly to gain access to the screen. Use a bent paper clip to remove the screen and clean off any deposits with an old toothbrush.
Removing the Supply Screen on Other Models Popping screen out with paperclip Enlarge Image
On some models it’s not necessary to remove the supply assembly to clean the screen. Try making a 1/8-inch right-angle bend in one end of a stiff paper clip. Insert the bent end in a hole near the edge of the screen. Turn the bend so it grabs the screen and pull down gently. The screen should pop out.
Checking the Flush Rod Check the flush rod Enlarge Image
With the water supply off, flush the toilet and gently lift up the flush rod. Measure the clearance from the top of the actuator to the bottom of the flush rod. To adjust, loosen the actuator setscrew and raise or lower the actuator by rotating it clockwise or counterclockwise.
Cleaning Debris Push down actuator to flush Enlarge Image
Turn the water off to the toilet and flush it by pushing down on the actuator. When the unit begins to flush, carefully raise the actuator to allow debris to be flushed away through the lines.
What Parts are Replaceable? Supply assembly parts Enlarge Image
Replaceable parts vary from model to model. Parts are often available as repair kits or replacement assemblies, such as (A) lower supply assembly with hose, (B) upper supply assembly, and (C) actuator with setscrew.
What If… I Have to Replace the Actuator? Actuator Enlarge Image
Proper vertical placement of the actuator is crucial to the operation of a pressure-assisted toilet. A built-in device allows you to position a replacement accurately. Screw the cartridge in until one black line shows. Turn the water supply back on and rotate the actuator clockwise in quarter turns until the water stops. Return the flush rod to its operating position.
Checking the Actuator (Flush Valve Cartridge) for Wear: Step 1 Move flush rod out of the way Enlarge Image
Checking the actuator requires removing it, which means shutting off the water, moving the flush rod out of the way, and loosening the setscrew. To move the flush rod, disconnect it from the flush handle and lift it up and away from the actuator.
Checking the Actuator (Flush Valve Cartridge) for Wear: Step 2 Unscrew actuator with handles of a pair of slip-joint pliers Enlarge Image
Loosen the actuator setscrew and slide the rubber-coated handles of a pair of slip-joint pliers into the recesses at the top. Unscrew the actuator (counterclockwise) until you can pull it free.
Checking the Actuator (Flush Valve Cartridge) for Wear: Step 3 Install new cartridge Enlarge Image
Pull out the actuator and inspect the O-rings for any damage. If they’re worn, replace the actuator. Install the new cartridge (or replace the old one) by turning it clockwise. Turn the water back on and, if it still runs after it’s full, tighten or loosen the actuator in quarter turns until it stops.
Checking the Air Regulator: Step 1 Remove the muffler cap Enlarge Image
To check the air regulator (air inducer), remove the muffler cap and flush the toilet. You should hear the sound of air being drawn in. You also can place a couple of drops of water on the hole in the cap and flush the toilet. The water should be drawn into the cap. If it doesn’t, go to Step 2.
Checking the Air Regulator: Step 2 Duck-bill valve Enlarge Image
The duck-bill valve is inside the air regulator. If it gets clogged with mineral deposits, it prevents the air regulator from working properly. Remove the cap and the valve and clean the valve parts with a soft toothbrush.
Checking for Leaks Pour water into cartridge housing area Enlarge Image
To check the flush-valve cartridge for leaks, pour a small amount of water into the cartridge housing area. If bubbles form at the center or the edge of the cartridge, replace it. If the vacuum breaker is leaking, it is likely that the water pressure is insufficient or the inlet-screen in the supply assembly is plugged.