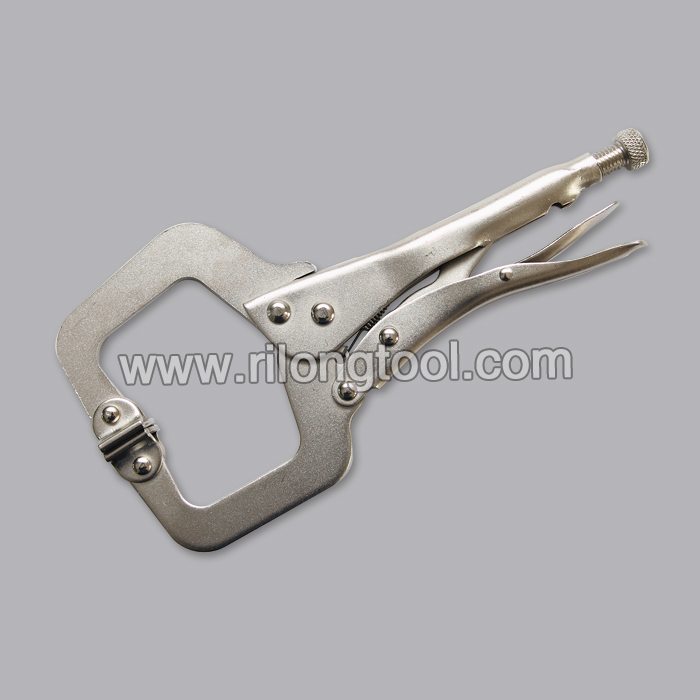
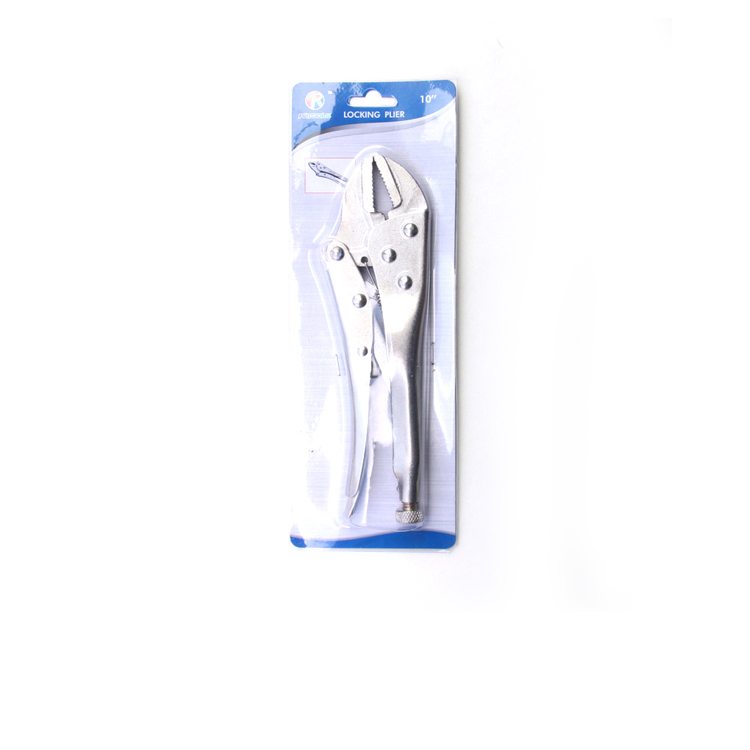
Professional Design 10″ Forehand Flat-nose Locking Pliers in Japan
Short Description:
Product Detail
Product Tags
Assume full responsibility to meet all demands of our clients; achieve continuous advancements by promoting the growth of our clients; become the final permanent cooperative partner of clients and maximize the interests of clients for Professional Design 10″ Forehand Flat-nose Locking Pliers in Japan, "Passion, Honesty, Sound service, Keen cooperation and Development" are our goals. We are here expecting friends all over the world!
Basic Information
■Model Number: RL-DLQ009A
Additional Information
■Material: A3# steel (Q235)
■Size: 10”
■Surface Treatment: Nickel-plated
■Heat Treatment: Optional
■Package: Suction Card
■OEM: Acceptable
■HS Code: 8203200000
■Samples: For FREE
■Delivery Time: Always 30 working days depending on the order quantity
■Packing: By standard cartons
Product Description
■Mainly used for clamping parts to rivet, weld, grind and so on, which is characterized by the powerful clamp force produced by the jaw. It can lock tight so that the parts won’t fetch away. Besides, jaws have a lot of levels to adjust for the use of different thickness of parts, and it also can be used as a wrench.
■Flexible using, long life and good tenacity.
■The screw tuning button can give the best clamp size easily.
Product Image
https://www.showmecables.com/product/Neutrik-3-5mm-Stereo-Plug-Solder-Right-Angle-Connector-Metal.aspx
Do you have a DIY project or repair that you need to make? Our right angle 3.5mm stereo connector will provide an inexpensive solution for creating a dual channel audio cable.
A stereo connector can be identified by the two black plastic bands near the tip of the cable. 3.5mm refers to the diameter of the plug. It is the most common size plug for small electronic devices such as headphones.
This connector contains an all metal plug and soldering points and is angled 90 degrees for a low profile, compact solution.
To install the connector, you will need: A soldering iron, solder, a wire stripper and cable. Since this is a stereo connector, our cable will need two center conductors and a shield.
Unscrew the strain relief and slide it onto the audio cable. Using a cable stripper, strip back the cable jacket. Twist the shield together. Strip the jacket around the center conductor. Tin the center conductor and shield by adding solder to the ends of each wire. Tinning helps makes a more lasting and professional bond.
Take the connector and with a vice or helping hands, tin the solder points on the connector.
The sleeve is the longest piece of metal, coming out of the back of the connector. If you are unsure of which solder point corresponds to the tip or sleeve, you can use a multimeter to check continuity.
Solder the tinned shield to the sleeve and the center conductor to the tip. Using pliers, pinch the strain relief onto the outside jacket. Slide up the strain relief and tighten onto the connector.
Congratulations, you have successfully soldered the 3.5mm connector.
For all of your cable and connector needs, choose Show Me Cables.
Connect with Us Online:
https://twitter.com/showmecables
https://www.facebook.com/showmecables https://www.showmecables.com/blog
1) First, take note of your stance settings and remove the bindings.
2) Always sharpen the base edge before moving on to the side edge.
3) Use a wetted diamond stone to remove any rust and burrs.
4) Before working on the base edge, check with the manufacturer to determine the base-edge angle your board is set at. Most boards come from the factory with a 1-degree bevel, but you’ll want to be certain before taking a file to your board.
5) Set your board on the stand with the base facing upwards, and attach a file to the file guide at the desired angle.
6) Working tip to tail, run the file guide down the board in smooth and even strokes, making sure to overlap where each stroke finished. If the edge is in good shape, this should only require a couple of passes.
7) For the side edges, secure the board in the vice with the base perpendicular to the floor and facing away from you.
8) Like the base edge, check the angle your side edges are set at; most boards come from the factory with a 1, 1.5, or 2-degree side-edge angle.
9) Secure the file in the file guide at the appropriate angle, and work tip to tail in smooth strokes until a sharp edge is achieved.
10) Go over the edges with a gummy stone for polishing and to remove any burrs that may have been pushed up while sharpening.
11) Head to the hill!
– See more at: https://www.backcountry.com/snowboard