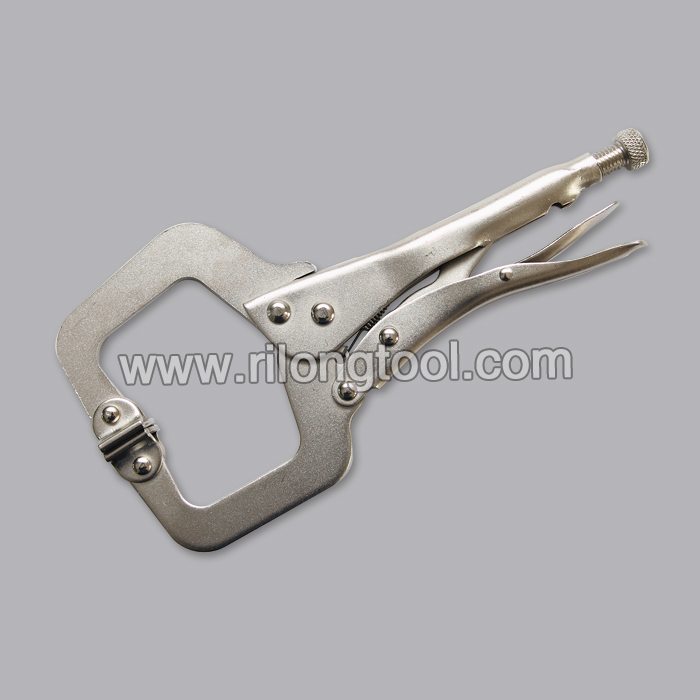
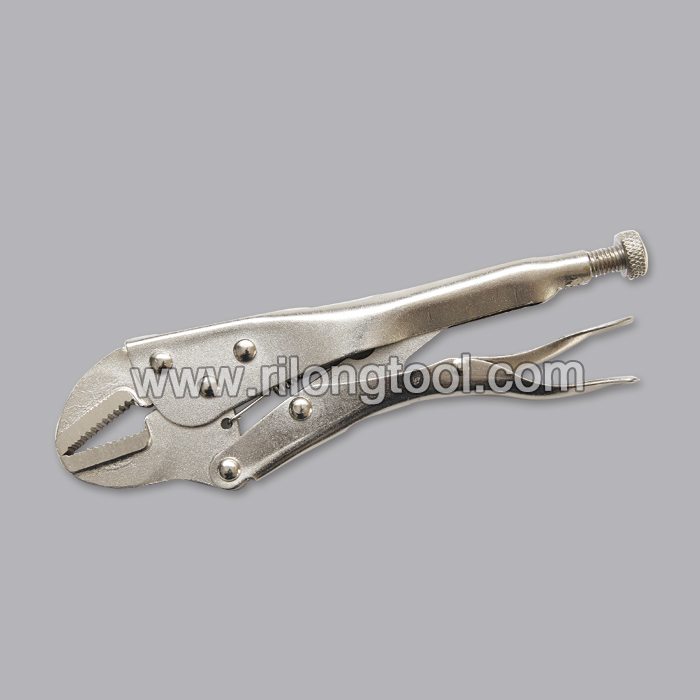
Massive Selection for 10″ Backhand Flat-nose Locking Pliers Export to Angola

Short Description:
Product Detail
Product Tags
Sticking to the belief of "Creating products of high quality and making friends with people from all over the world", we always put the interest of customers in the first place for Massive Selection for 10″ Backhand Flat-nose Locking Pliers Export to Angola, Our company maintains safe business mixed by truth and honesty to keep long-term relationships with our customers.
Basic Information
■Model Number: RL-DLQ010
Additional Information
■Material: A3# steel (Q235) or 45# steel
■Size: 10”
■Surface Treatment: Nickel-plated, Zinc-plated, Black Oxide, Electrophoresis
■Heat Treatment: Optional
■Package: Blister Card, Suction Card, Tie Card, Double Blister Card
■OEM: Acceptable
■HS Code: 8203200000
■Samples: For FREE
■Delivery Time: Always 30 working days depending on the order quantity
■Packing: By standard cartons
Product Description
■Mainly used for clamping parts to rivet, weld, grind and so on, which is characterized by the powerful clamp force produced by the jaw. It can lock tight so that the parts won’t fetch away. Besides, jaws have a lot of levels to adjust for the use of different thickness of parts, and it also can be used as a wrench.
■Flexible using, long life and good tenacity.
■The screw tuning button can give the best clamp size easily.
Product Image
Machining A Set Of Vintage Style Rope Knurls, by Clickspring
In this video I make a set of classic rope knurling wheels, to put some ornamental rope knurl patterns on some of my future projects. There’s plenty of lathe and mill work, as well as a bit of hand finishing with a fine cut file.
This is the main video in a series of at least 3, that will relate to the subject of creating these beautiful rope knurl patterns. Be sure to check out the other videos when you get a chance.
The other two videos in this little series are:
Spare Parts #5 – Making A Bump Style Knurling Tool Holder: https://www.youtube.com/watch?v=TyN1VBgv5cQ
Spare Parts #4 – Making, Hardening And Tempering A Form Tool For The Lathe: https://www.youtube.com/watch?v=nZsnGhwsjjo
Free plans for the double angled cutter, and form tool:
https://www.clickspringprojects.com/uploads/3/8/2/2/38221101/double_angled_cutter.pdf
https://www.clickspringprojects.com/uploads/3/8/2/2/38221101/form_tool_profile.pdf
If you would like to help support the creation of these videos, then head on over to the Clickspring Patreon page: https://www.patreon.com/clickspring
Ask Me A Question:
https://www.clickspringprojects.com/contact.html
Follow Clickspring:
https://www.patreon.com/clickspring
https://www.facebook.com/Clickspring1
https://plus.google.com/u/0/113668471124073837794/posts
https://instagram.com/clickspring1/
https://www.tumblr.com/blog/clickspring1
https://www.pinterest.com/clickspring1
Abbreviated Transcript:
00:31 The rope pattern is formed by a knurling wheel that looks like this, that has a number of fine teeth around its perimeter. Now to form those teeth, I’m going to use an additional cutter that looks like this.
00:44 Each tooth on this cutter has a 90 degree V profile, and there are 4 teeth milled around a central axis. There’s relief at the back of each tooth, and the cutting rake angle will be generated by milling past the tool centerline. I’ll be using some of this EN8 steel to make both the cutter and the knurl.
02:43 After finding the edge of the work, I positioned this end mill, the correct distance past the centerline, and then set about milling the gaps between the teeth. For this part of the job I’m using the simple indexing plate of the dividing head, thats just behind the chuck.
03:32 For the cutter to work correctly, the back side of each tooth needs to be relieved, so I’ll be removing this little corner of metal here on each tooth, and shaping it to blend with the back surface.
04:20 But I thought it might be worth showing what happens to the steel if nothing is done to protect it while its heated, so I’ve wrapped the working end of the cutter as usual, but I’ve left the chucking end uncoated, and exposed to the torch flame. With nothing to stop the oxidation, the unprotected end has formed a thick black scale, while the protected end is mostly free from scale, and looking quite bright.
05:39 Now you’ll have noticed that the knurl teeth are cut on an angle to the body of the knurl, which means that the knurl blanks need to somehow be securely presented at an angle to the cutter. I could have simply cut them while they were still attached to the parent stock, but I figured since I was making a few of them, a dedicated holder would be bit more efficient, and I can keep it for when I make more in the future. So I made this arbor to hold them on the mill.
07:47 Back onto the mill, the work was again secured in the dividing head, and then tilted to an angle of 30 degrees. I took some time to cutter was carefully positioned against the work, to make sure it was centered on the blank, and then the teeth were cut into the knurl.
08:19 For this particular knurl I indexed for 40 teeth, which was simply one turn of the handwheel on the dividing head, for each cut. Now the quality of the cut was a little rougher than I would have liked, so I gave it another pass without hanging the depth, and that seemed to clean it up.
08:56 With that first one complete, I used a few different angles, as well as index counts, to make the full set of 5 knurls, which will give me a good range of different rope knurl patterns. Each of those knurls was quench hardened and then tempered. So that’s a set of rope knurls complete and ready for use, so let’s give them a run.
09:41 Bump style knurling tools generate an enormous side force on the work, so tailstock support definitely helps. And even with this support, the work still deflects quite a lot as the pattern is formed.
10:24 Now I didn’t make any effort to calculate the correct diameter to avoid double tracking, in fact I was surprised to find that it wasn’t really necessary. In no time at all the knurl cut its way down to a diameter that worked, and the pattern started to jump out.
References:
Frank Ford (Luthier/Machinist)
https://www.frets.com/HomeShopTech/Projects/RopeKnurl/ropeknurl.html
Machining A Set Of Vintage Style Rope Knurls, by Clickspring