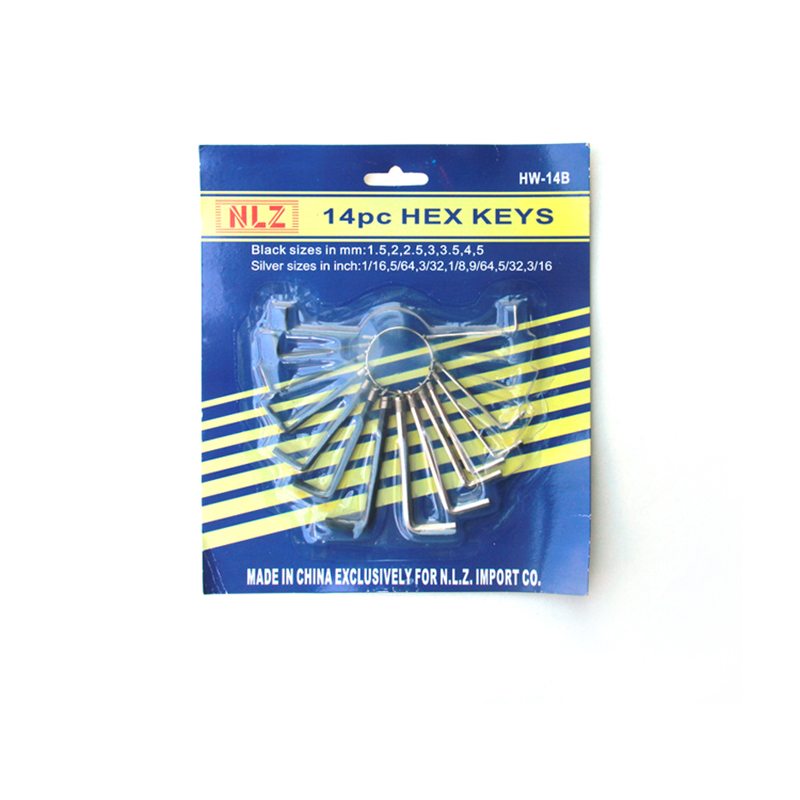
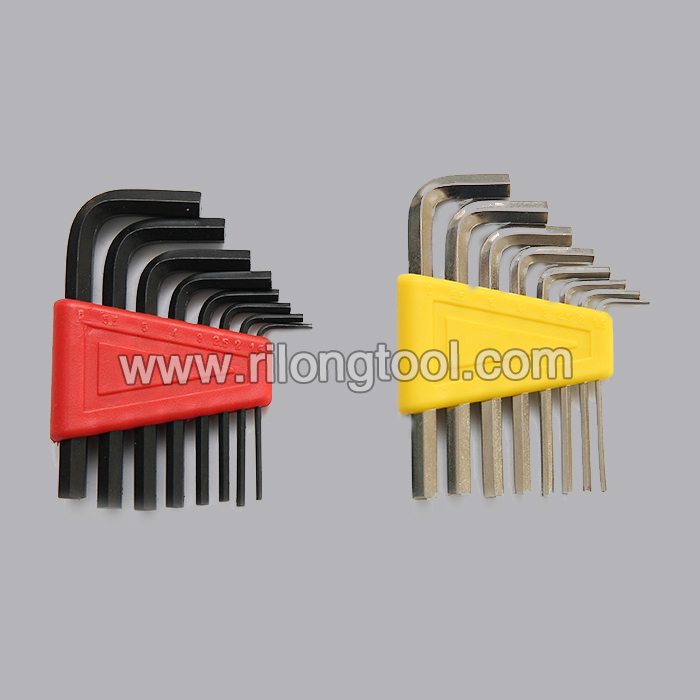
Lowest Price for 8-PCS Short Hex Key Sets packaged by plastic frame to Puerto Rico Factories
Short Description:
Product Detail
Product Tags
Gaining customer satisfaction is our company's aim forever. We will make great efforts to develop new and top-quality products, meet your special requirements and provide you with pre-sale, on-sale and after-sale services for Lowest Price for 8-PCS Short Hex Key Sets packaged by plastic frame to Puerto Rico Factories, winning customers' trust is the gold key to our success! If you are interested in our products, please feel free to visit our web site or contact us.
Basic Information
■Model Number: RL-NLJ006
Additional Information
■Material: 45# Carbon Steel
■Size: 1/16″-3/8″, 1.5mm-10mm
■Surface Treatment: Zinc-plated, Black Oxide
■Heat Treatment: Optional
■Package: Plastic Frame
■OEM: Acceptable
■HS Code: 8204110000
■Samples: For FREE
■Delivery Time: Always 30 working days depending on the order quantity
■Packing: By standard cartons
Product Description
■Ningbo Rilong Hardware Tools Factory can provide various kinds of Hex Key with different sizes and packages.
Product Image
Here at Diversified our in house test bed allows us to pull and certify a minimum of 10,000lbs to a max of 100,000lbs. Our real-time graph shows you the test as it was performed. With 100,000lbs test capability we can break up to 1 1/8″ wire rope and up to 5/8″ gr80 chain and recertify up to 1 3/4″ wire rope and 1″ Chain.
Fell free to visit our website and other video’s on youtube.
www.chainandrigging.com
https://www.homeownerseries.com
This is video #2 of a 3-part series. The videos are:
Part 1 = https://youtu.be/8xlJXrSK3ag?hd=1
Part 2 = https://youtu.be/BLDvTRZlyCo?hd=1
Part Overview = https://youtu.be/KCPlbiTcLc4?hd=1
To watch the Flush Valve Playlist = https://www.youtube.com/view_play_list?p=31C570921B83280C
Flush Valve
Parts Needed
Before this project is started a new flush valve kit will need to be purchased at a hardware or plumbing supply store. This kit should include the flush valve assembly, which is the overflow tube and seat, seals and lock nut, flapper valve with lift chain and a sponge gasket. Additionally, a supplemental sponge gasket may need to be purchased depending on the curvature of the connection between the tank and the base. The last items that need to be purchased are new tank mounting bolts. Generally, a tank will require two or three mounting bolts so purchase enough for your given toilet.
Tools Needed
The tools necessary for this project are an adjustable open-end wrench or socket wrench, a large sponge, a flat-head screwdriver, a pair of rib-joint pliers, a cement mixing tub, a small plastic container, and possibly a mini-hacksaw.
Replacement
Before beginning this repair shut off the water supply, remove the lid to the tank, and flush the toilet. Once the tank is mostly empty, sponge out the rest of the water draining it into the toilet’s bowl. With the tank empty, position a plastic container to collect water under the water supply hose and unscrew the hose from the base of the tank, having any water drain into the plastic container below. To remove the tank, its mounting bolts will need to first be unscrewed.
Using the flat head screwdriver to hold the head of the bolt, and an adjustable open-ended wrench to loosen the nut remove all of the tank mounting bolts. If the bolts are corroded and too difficult to unscrew, cut through them with a mini-hacksaw. When the bolts are free lift the tank off of the base and place it into the cement-mixing tub.
With the tank on its side peel off the sponge gasket reveling the lock nut. While holding onto the flush valve assembly inside the tank, unscrew the lock nut from the base of the tank using a pair of rib-joint pliers.
With the assembly disconnected from the tank unhook the chain from the flush handle, and remove the old flush valve assembly. Take the new flush valve assembly insuring that its seal is in place, and insert it into the tank of the toilet with the overflow tube at the ten o’clock position. Then place the external seal on the flush valve and hand-tighten the lock nut. Finally tighten the lock nut with rib-joint pliers and affix the sponge gasket over the lock nut. Reattach the flapper valve to the overflow tube and the chain to the flush lever.
Insert the tank mounting bolts with washers back through the openings in the base of the tank, once they are in place set the tank back on the base of the toilet lining up the mounting bolts with their corresponding openings in the toilet’s bowl. Hand tighten the lock nuts on the mounting bolts and finish off using the screwdriver and socket wrench to secure the bolts water tight with no movement between the tank and the base.
Now that the tank is re-installed the mounting bolts depending on personal preference, may be trimmed within a quarter inch from the lock nut, using a mini hacksaw. Reattach the water supply hose and turn on the water supply valve. The tank should begin to fill. As the tank fills inspect the joint between the base and the tank for any leaking. Once the tank is full make any adjustment to the overflow tube, flush valve and tank fill valve for optimum water level. With all adjustments complete test cycle the toilet and replace the toilet’s tank lid.