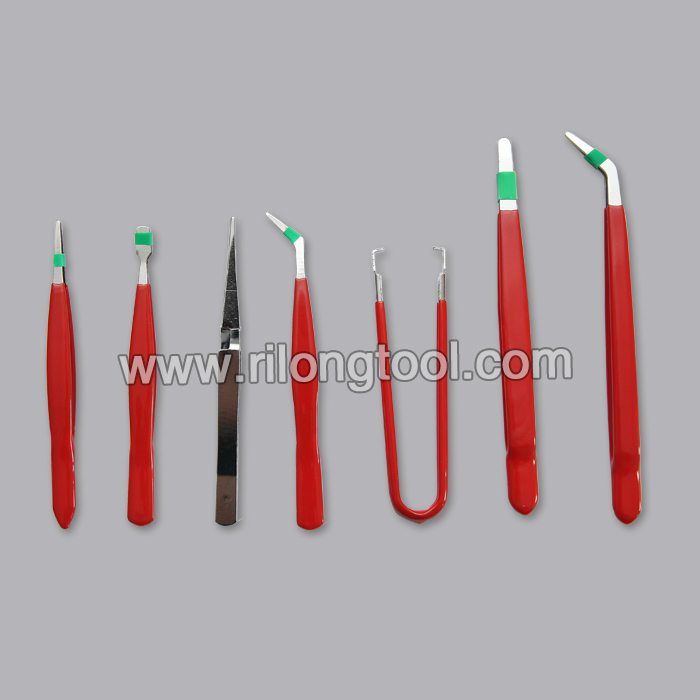
Hot-selling attractive 7-PCS Anti-static Tweezer Sets Cyprus Factories
Short Description:
Product Detail
Product Tags
We support our buyers with ideal high quality products and high level service. Becoming the specialist manufacturer in this sector, we have gained rich practical experience in producing and managing for Hot-selling attractive 7-PCS Anti-static Tweezer Sets Cyprus Factories, Our final goal is "To try the best, To be the Best". Please feel free to contact with us if you have any requirements.
Basic Information
■Model Number: RL-NZ007
Additional Information
■Material: Q195 Cold-rolled Steel
■Thickness: 0.8mm, 1.0mm, 1.2mm
■Surface Treatment: Chrome Plated
■Finish: Polished
■Package: Suction Card
■OEM: Acceptable
■HS Code: 8203200000
■Samples: For FREE
■Delivery Time: Always 30 working days depending on the order quantity
■Packing: By standard cartons
Attention
■Do not heat it.
■Do not take acid drugs with it.
■Keep it clean after using it.
Product Image
A common question that we frequently get asked is, “How do I use padding compound?” So we’ll show you what’s needed & how to pad, with a padding press and without.
Padding compound is used most often to create notepads, to pad together forms or applications or coupon payment books. Sometimes called pad glue or gum padding, it resembles a thicker, white craft glue, but it is not the same.
Materials needed to pad include:
padding compound
a brush to apply it
and a pad knife to separate each pad
chipboard is often used on the back of pads for stability.
Depending on your workload volume and your patience, a padding press might also be worth investing in.
While it’s possible to pad without a padding press, using one can help make quicker work of padding since it makes quicker, easier work of stacking and it allows you to pad more sheets at once. For this demo, we’re using the Martin Yale J1811 model.
Attach the stacking backboard panel on the press. Place some extra paper or chipboard on the bottom of the press.
Firstly, we need to prepare our sheets for padding using chipboard or colored sheets to show the bottom of each pad.
Jog your sheets in manageable lifts and stack them cleanly in the press against the stacking board.
Add some additional sheets or chipboard on top of the stack.
Then place the clamp plate in the press and tighten it down. The stack’s padding surface should be like a solid brick, having airspace in there will cause the pads to fall apart.
Apply the padding compound with a pad brush. Just a thin to medium coat is all that’s needed. Applying more than one coat really does nothing to further grip the sheets, it just puts more compound on top of the first coat. Be sure to brush from the middle to the outside, otherwise you’ll get glue on the sides too.
Always soak, then wash your padding brush with just water so that the padding compound will not harden it it.
Allow the padding compound to dry – it’s usually dry to the touch within 20 to 60 minutes.
Once dry, release the clamp & use a pad knife to slit the pads apart. If you applied the correct amount of compound, the sheets peel off cleanly, leaving no skin of pad glue stuck to the pad.
————
Padding can still be done without a padding press using the edge of a table or countertop. Prep the work are by folding a channel out of paper or card stock to catch excess glue. Fold it so that if viewed from the side, it looks somewhat like a square root symbol. Place your glue catcher at the edge of your workspace & hold it in place with some extra scrap paper or chipboard.
Begin stacking your sheets to be padded, Jog them in manageable lifts and try to keep all the edges as flush & flat as possible.
Once complete add a heavy weight on top of the stack at the padding edge. The stack’s padding surface should be like a solid brick, having airspace in there may cause the pads to fall apart.
Here we’re using a ridiculously large dictionary, but you could use anything heavy… like bricks; a cinder block; an old PC; those phone books that stack up on your doorstep; your sumo wrestler friend; an elephant; a Sherman tank…
alright you get the picture, you can use almost anything heavy.
Now apply the padding compound with a pad brush. Remember, just a thin to medium coat is all that’s needed & to brush from the center outward.
Make sure you soak, then wash your padding brush with just water so that the padding compound will not harden it it.
Once it’s dry to the touch – within 20 to 60 minutes. remove the weight.
Finally use a pad knife to slit the pads apart.
And that’s it! Remember, If you have any questions on padding or any other binding issues, feel free to contact www.cfsbinds.com or email them to me at info@cfsbinds.com