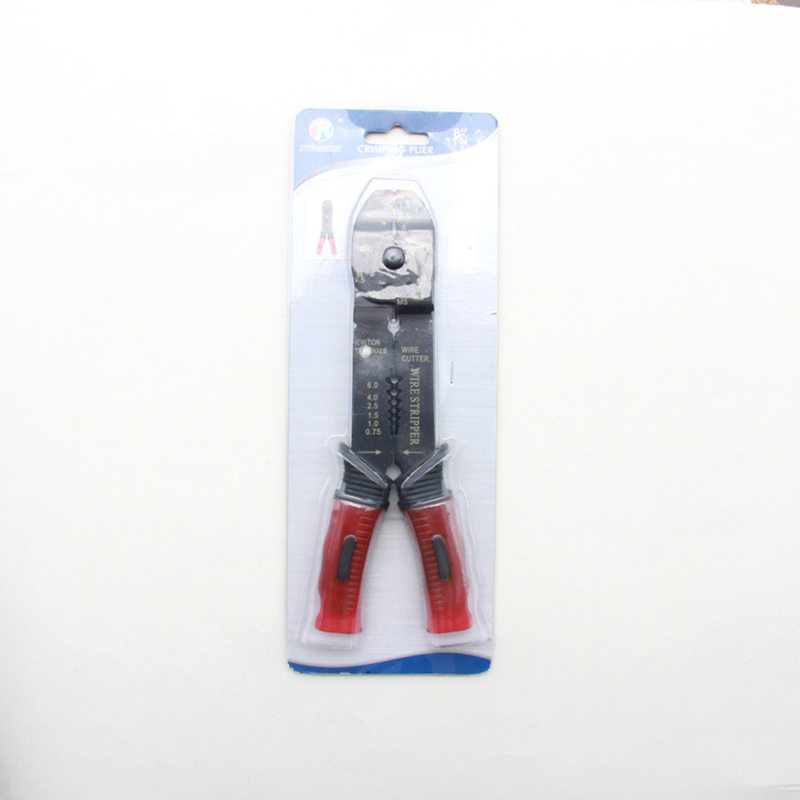
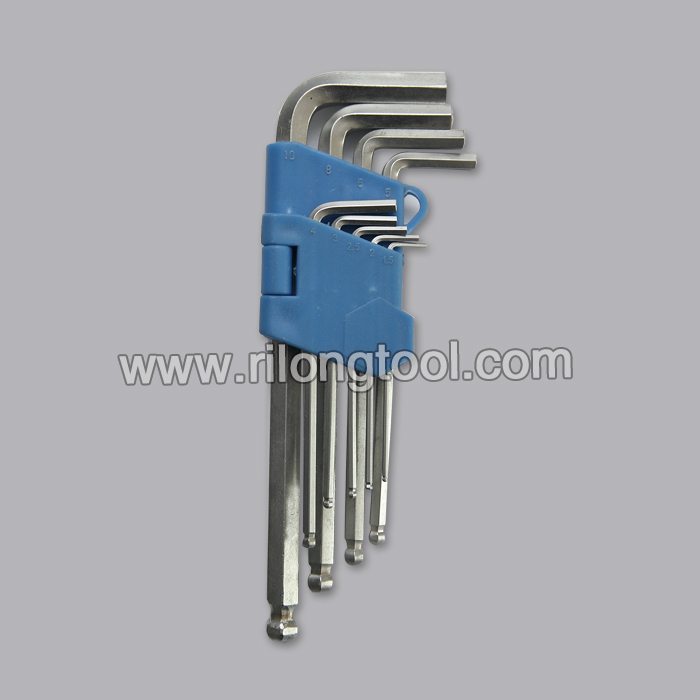
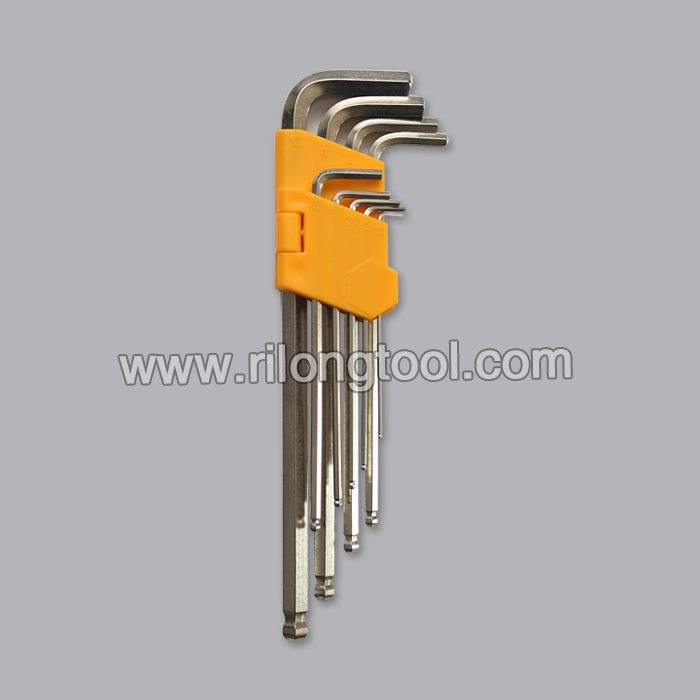
Good quality 100% 9-PCS Ball-point Hex Key Sets packaged by folded plastic frame Czech Manufacturer
Short Description:
Product Detail
Product Tags
"Sincerity, Innovation, Rigorousness, and Efficiency" is the persistent conception of our company for the long-term to develop together with customers for mutual reciprocity and mutual benefit for Good quality 100% 9-PCS Ball-point Hex Key Sets packaged by folded plastic frame Czech Manufacturer, items won certifications with the regional and international primary authorities. For far more detailed information, please contact us!
Basic Information
■Model Number: RL-NLJ012
Additional Information
■Material: 45# Carbon Steel
■Size: 1/16″-3/8″, 1.5mm-10mm
■Surface Treatment: Zinc-plated, Black Oxide
■Heat Treatment: Optional
■Package: Plastic Frame
■OEM: Acceptable
■HS Code: 8204110000
■Samples: For FREE
■Delivery Time: Always 30 working days depending on the order quantity
■Packing: By standard cartons
Product Description
■Ningbo Rilong Hardware Tools Factory can provide various kinds of Hex Key with different sizes and packages.
Product Image
https://www.veronicakrestow.com
How to make mala – a simple, guided step-by-step video to make it easy for you to make your beautiful mala.
Check out my new book, “The Diamond Process: Using Everyday Triggers to Awaken the Treasure Within” HERE: https://amzn.to/1PMD2V5
Hi Loves:
I made this video for you on how to make mala months ago as promised, but have been ultra busy. Thanks to a few of you reminding me, I got to editing it today…. and voila, here it is.
The following are the materials you need to make your mala and some resources:
1. scissors
2. 108 semi-precious stone beads/crystal beads (I recommend the round, cut/faceted 6 mm size beads as they shine brighter) or you can always use wood beads for a more earthy feel. I buy my beads at the jewelry mart in downtown LA, but you can also find them online.
3. bead cord (I buy this through artbead.com and I get the Griffin brand at a .70 mm size No. 6- this is a thicker cord that is more durable yet fits through the holes of most beads)
4. meru (sanskrit for “mountain piece”.) This is a larger bead that will stand out from the rest of the beads. This bead is not one of the 108 (it is an additional bead that carries your prayers, so to speak… a power piece). It also helps you keep track, telling you when you are done with your 108 mantras. If you wish to do another round, once you hit the meru, just turn back the other way and go another 108 mantras).
5. round nose jewelry pliers (you want to make sure that the tips of the pliers are thin so that they are easy to grab hold of the cord and tie/untie knots with.) Some people don’t use these at all and do it all by hand. I find these very useful though myself.
6. Beadsmith (this tray allows you to lay out your pattern of the beads so that you can create your design easily. If you are just using one type of stone, you don’t really need this at all).
7. one tassel (I buy this at my local bead shop). Some don’t put a tassel at all. It’s up to you. ![]()
8. crazy glue
9. Most importantly, your full Presence…. play some music, light a candle and enjoy putting your love into your beautiful mala. This is the most important “material.” They will shine bright!!!!!! As do YOU!!!
Enjoy your making your mala and light to your journey….
Much LOVE!
Veronica
THE DIAMOND PROCESS™ COACH TRAINING IS COMING UP. To save your space for this exclusive 6-month transformational certification program, APPLY HERE: https://bit.ly/295yDmw (space is limited)
Silk Natural’s Instructions:
Pressing SN Loose Eye Shadows with Great Impressions Pressing Medium
Materials: One pressing kit
a pair of pliers- regular slip joint pliers are fine, but longer nose Channel Lock pliers are preferable. Vice
grips or a c-clamp will also work. a 25 millimeter coin, or pressing disk, paper towels, a mixing bowl- a small measuring cup, or 30 gram jar is fine
a permanent marker for labeling the bottom of your eye shadow
1) Protect your work surface- this does get messy. It washes off pretty easily, but
you may want to wear gloves.
2) Place the eye shadow in the mixing bowl and add 5-6 pumps of Great
Impressions. The goal is to add just enough to get all of the powder to stick
together, but not so much that it’s mushy. It’s really similar to making pie crust if
you’re an experienced baker.
Mattes need 5-6 pumps. Shimmers will need slightly more. It’s VERY important
to use as few pumps as possible for matte colors otherwise they shrink too much
while they dry, and will separate from the pan. Most mattes can be pressed with 6
pumps- Fern, and Raven needed 7-8.
Shimmers generally need 8-9 pumps (for Frenchie start with 7).
Start with fewer pumps
than you think you’ll need. You can always add more if it’s too crumbly, but it’s
very difficult to get a good press if it’s too mushy.
3) Stir, and knead the mixture until everything comes together as a lump. Mattes
will look very powdery for a while, but they will come together. Keep stirring.
4) Place the mixture in the pan, and level it as best as you can.
5) Cover it with a paper towel, add the pressing disk on top and apply firm, even
pressure for 10 seconds.
6) Using the pliers repeat this process 2-3 more times using a dry spot on the
paper towel until there is no excess moisture. The firmer the press the more
durable the finished product will be. They break very easily if there is excess
liquid left behind. You can’t over press them.
If you’re getting marks from the pliers on the back of the pan you can use the pod
to protect the bottom. Just place the pan in the pod, and continue pressing.
7) Write the name, and date on the eye shadow with a permanent marker, and set
it aside to dry for 12-24 hours. Do not heat them- you’ll boil the alcohol and
create air bubbles, or melt the magnesium stearate, and turn it into an unusable
lump. Yes, it’s torture waiting for them to dry.
Troubleshooting:
If you’ve added too much pressing medium just gently blot the surface several
times until it’s not mushy, and then press very gently and slowly.
If one breaks you can re-press it by wetting it with a little rubbing alcohol, and
pressing it back in the pan.
Colors with more
silica- i.e. the Eyelights will need 10-12 pumps or more. Shelf life- Pressed eye shadows have an approximate shelf life of 2 years because of the propanediol in the
mixture.
They’ll probably be ok after 2 years, but we don’t know. Please write the date on your pressed shadows for
maximum safety.
The pans will rust if exposed to water for a long time. They are fine in the pressing process, but if they sit in
water for a while they will rust.
You can sanitize the pans with rubbing alcohol prior to pressing, but make sure they’re very dry before
adding the eye shadow.
It’s not really a necessary step because they’ll be in contact with alcohol for several hours, and that should be
sufficient.
Don’t dip a wet brush into your pressed shadows. To use them as a wet liner scrape up a little pile of powder,
then use a damp brush to pick up the powder.
Durability- the pressed shadows survive a standard drop test i.e dropping it onto concrete from 12 inches.
These are more fragile than a traditional pressed product, but should withstand carrying them around in your
purse.
You might want to carry a pod with your colors just in case one breaks.
Some pigments may become less intense. Carmine, and dyes do seep out during the pressing process. SN
doesn’t use dyes in their eye shadows, but other manufacturers might. Of the SN line Breathe was the only
one we felt lost a lot of vibrancy during the process. Red iron oxide also seems to bleed, but doesn’t
generally create a noticible change.
Wear time should be about the same. The colors may change slightly, but by the time you put it on your eye
over a primer you probably won’t notice much of a difference.
We have tested these with ALL of the current SN eye shadows, but we don’t know how shadows from other
manufacturers will work. It should be fine, but we don’t know. Press at your own risk.
Disclaimer: These products were sent to me. I am not sponsored and all opinions are honest and my own.