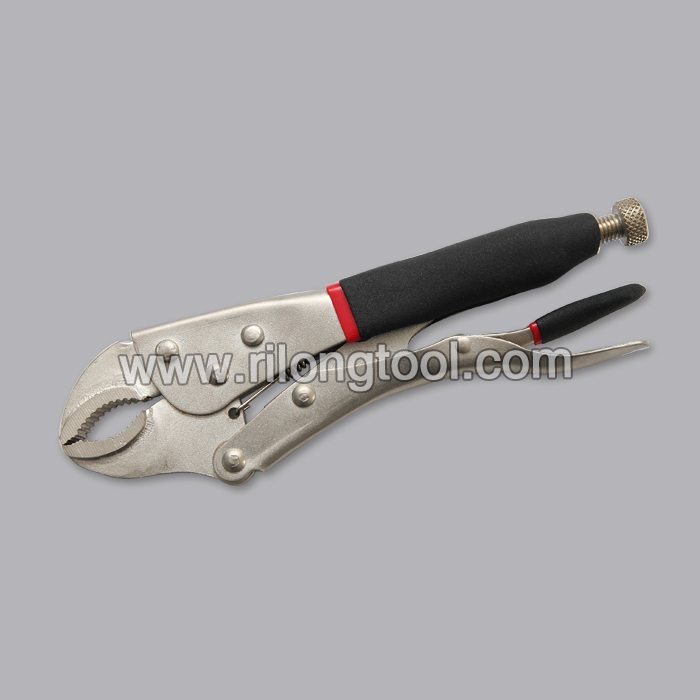
factory wholesale good quality 6″ C-clamp Locking Pliers Factory in Florence

Short Description:
Product Detail
Product Tags
We have a highly efficient team to deal with inquiries from customers. Our goal is "100% customer satisfaction by our product quality, price & our team service" and enjoy a good reputation among clients. With many factories, we can provide a wide range of factory wholesale good quality 6″ C-clamp Locking Pliers Factory in Florence, Welcome friends from all over the world come to visit, guide and negotiate.
Basic Information
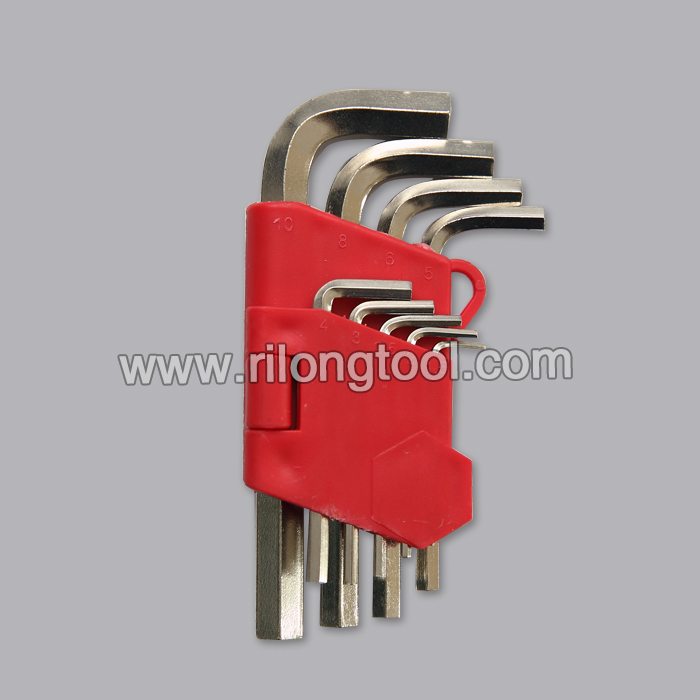
■Model Number: RL-DLQ017
Additional Information
■Material: A3# steel (Q235) or 45# steel
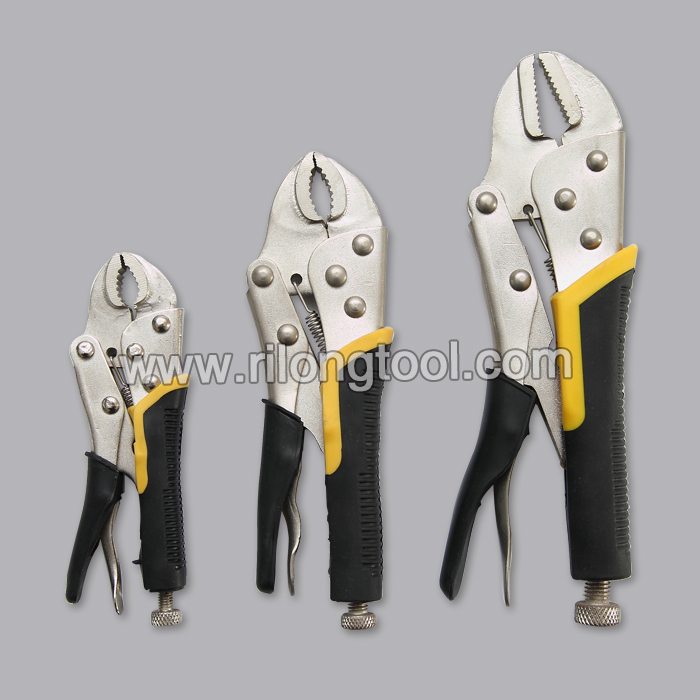
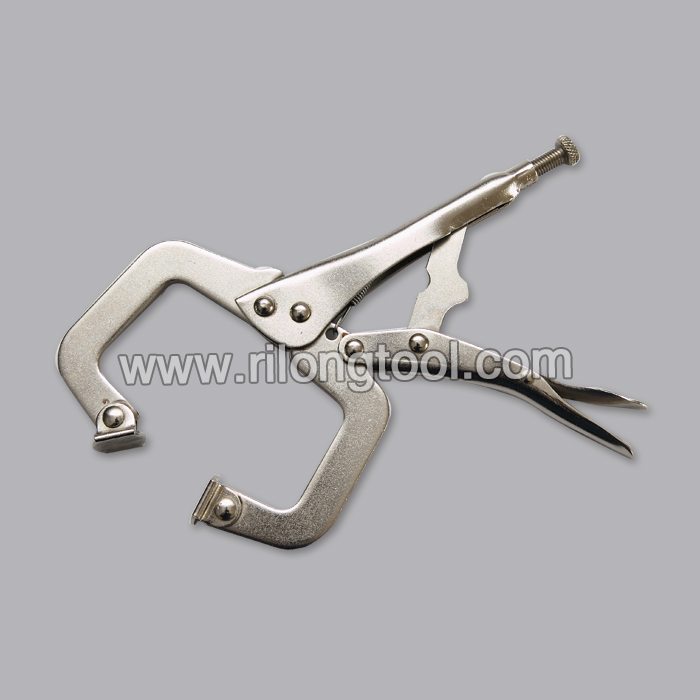
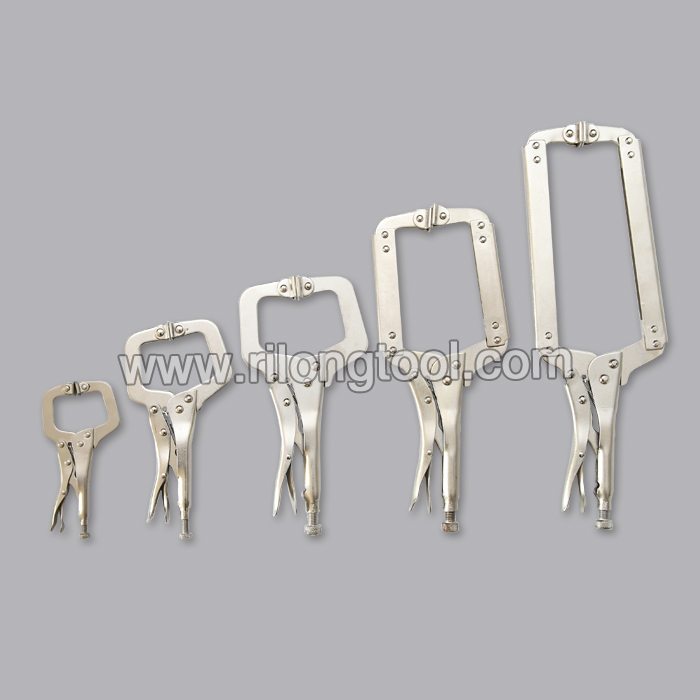
■Size: 6”
■Surface Treatment: Nickel-plated, Zinc-plated, Black Oxide, Electrophoresis
■Heat Treatment: Optional
■Package: Blister Card, Suction Card, Tie Card, Double Blister Card
■OEM: Acceptable
■HS Code: 8203200000
■Samples: For FREE
■Delivery Time: Always 30 working days depending on the order quantity
■Packing: By standard cartons
Product Description
■Mainly used for clamping parts to rivet, weld, grind and so on, which is characterized by the powerful clamp force produced by the jaw. It can lock tight so that the parts won’t fetch away. Besides, jaws have a lot of levels to adjust for the use of different thickness of parts, and it also can be used as a wrench.
■Flexible using, long life and good tenacity.
■The screw tuning button can give the best clamp size easily.
Product Image
***VISIT OUR SPONSORS***
https://www.traderadiators.com | https://www.grahamplumbersmerchant.co.uk | https://www.buteline.com/uk | https://www.adey.com
This video covers thermostatic radiator valves. How they work and how you can install them. We also cover which room to install them and why.
Today, we’re gonna look at thermostatic radiator valves otherwise known as TRVs. They individually control the temperature in the room to an individual radiator. Firstly, we’re gonna have a look at how to change them, and then we’re gonna have a look at how they work. I hope it’s very informative. Hold tight. So, how does a thermostatic radiator valve work, and what’s the difference between that and a normal radiator valve. Well, firstly, a normal radiator valve is just a valve that moves up and down and shuts off the flow of hot water from the boiler into the radiator, just like the tap on a bathtub. The main difference with a thermostatic radiator valve is that it automatically controls the amount of hot water going into a radiator according to the current heat of the room that it’s situated in. There are two main types of thermostatic radiator valve. One uses a spring that expands and contracts, and the other uses a wax jacket that does exactly the same. For this video, we’re gonna look at the spring type, because they both work in a very similar way. So, we have a spring that is made of metal that is very susceptible to the temperature around it. If the room is cold, the metal will be contracted because when metal is cold, it is contracted. Therefore, the valve jumper will be open and hot water will be allowed to flow into the radiator. If the room is warm, the spring will expand and that valve will be pushed down and the flow to the radiator will stop. And that’s how they work. A very common problem I have with customers is, sometimes they’ll come in, the room is cold, the radiator, when they feel it, blazing hot, and yet they still go to the thermostatic radiator valve and open it up more. That’s completely pointless. The room is cold, the radiator’s hot, therefore, the thermostatic radiator valve knows that the room is cold, and it’s trying to heat it up. If you go into a cold room and feel the radiator and it’s hot, do not touch the thermostatic radiator valve. Only touch it when you go into the room, and it’s cold, and you find that the radiator is cold. Also, another thing you need to consider, is where you can actually install thermostatic radiator valves. If you have house with two rooms, in one room you have the room thermostat, which controls the whole heating system, and one radiator. In the other room, you have another radiator and that has a TRV on it. Don’t put a TRV in the room that has the room thermostat in it. The reason for that is, if the TRV closes down, and the room thermostat is not satisfied, it will never knock the heating system off to the whole house, and you won’t get any saving. That room thermostat there needs to have an exactly true reading of the maximum capacity that the heating system can give out. Therefore, the radiator in the room with the room thermostat should have a lock shield on it that is fully open. So let’s go back to the house, and find out how you actually change a lock shield over for a TRV and really how easy they are to install. I’m assuming you all know how to drain down a heating system already. Finding the lowest point in the heating system and drain off, taking your hose outside and opening that up and making sure that the water supply is turned off to the heating system. Next, you allow air into all the radiators that you want to change in the TRVs. Generally, if you’re a bit worried about this, let air into every radiator in the house. You should hear the air sucking. As soon as you see your hose outside stop running, that should indicate that the heating system is drained down and you’re ready to change the valve. Let’s have a look here. As you can see, we’re removing this old lockshield valve here, which is just an on and off valve. So, now that we know the system is all drained down, we can loosen that off. Now’s the time just to make sure that the water has drained out of the system. As you can see it has. And then we can loosen off the 15mm pressure fitting on the bottom. As you can see, our new TRV isn’t going to fit on this current radiator insert. All new TRVs are supplied with a new insert, so this one here will need removing. There are special tools to do this. You can have a hexagonal tool that goes in like that, a square tool, a lug tool cut in here. This is quite an old one as you can see. Today I’m gonna use this one here because we’ve got hexagonal fitting on there. Now often you can just lift out and it may get out. But generally, you’ll have to just put the spanner on like this and then wind it out like that. There’s the old insert out, and that’s the old valve completely removed.