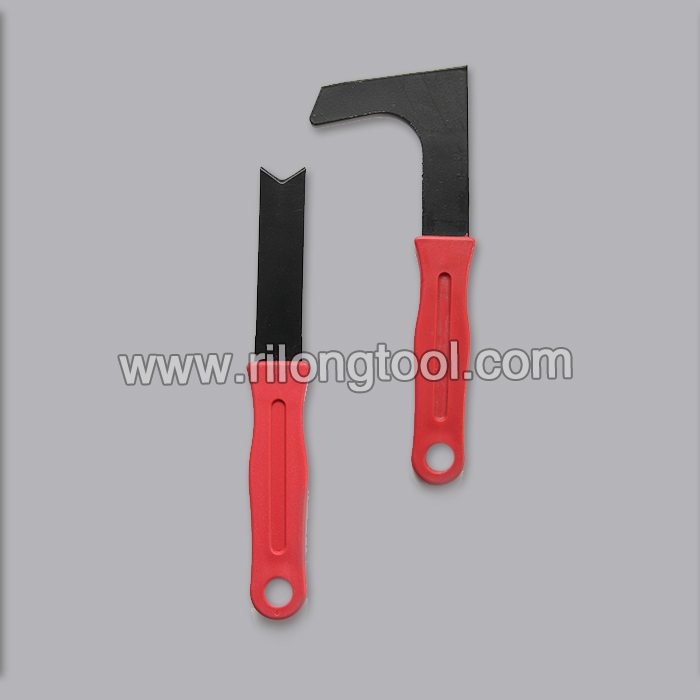
Factory Supplier for L-shape and Direct-shape Hay Knife with red handle in Cambodia
Short Description:
Product Detail
Product Tags
The company upholds the philosophy of "Be No.1 in quality, be rooted on credit and trustworthiness for growth", will continue to serve old and new customers from home and overseas whole-heatedly for Factory Supplier for L-shape and Direct-shape Hay Knife with red handle in Cambodia, We welcome new and old customers from all walks of life to contact us for future business relationships and mutual success!
Basic Information
■Model Number: RL-GCD002
Additional Information
■Material: Carbon Steel
■Size: 8”
■Surface Treatment: Black Oxide, Painting
■Handle: Injection molding
■Color: Optional
■Package: Suction Card
■OEM: Acceptable
■Samples: For FREE
■Delivery Time: Always 30 working days depending on the order quantity
■Packing: By standard cartons
Product Description
■Used to remove the weeds and stem leaf in the cracks.
Product Image
https://www.i-glamour.com/Brands/Tweezerman How to get the perfect brow with i-glamour.com and Tweezerman.
Learn how to build a router table for Woodworking for under $10 in this woodworking video for beginners. This simple router table is a good starting point for people who are learning woodworking or even the professional looking for a quick site setup.
For more woodworking tutorial videos please subscribe to our channel.
My Triton Router https://amzn.to/2ehy4nV
My Microjig Grr-Ripper https://amzn.to/2e5JMlX
My Musclechuck https://amzn.to/2dRH19B
00:00 Hey there after last weeks laptop video i had a few people ask me what if i don’t have a router table how can i do it, well we can make one so we going to make one in 10 minutes for 10 bucks probably less than 10 dollars.
all we need is a piece of wood for the fence a wing nut and a bolt and a piece of wood that is going to sit as out table so to start with we just take off the base plate off your router
sit the base plate down on and then with a pencil trace the holes where the screws are going to go. just around the middle it doesn’t mater if its not exactly in the middle then where just going to drill out our holes and then with a forstner bit we are just going to widen the hole a little bit
okay i have found the center and now I’m just going to use a forstner bit to drill out the hole that the router bit will come through.
okay now we have drilled out holes to mount the router and now its time to mount the fence I’m just using a small bit of wood i used something like this for years and i was quiet happy with it you can do more complex things if you need to do something a bit higher you can do a right angle type fence just for this quick little exercise we going to use this this is fine if you are just doing corners or template routing or whatever we will just drill out our holes for that.
and countersink on the other side with a forstner bit.
okay now were going to quickly mount the fence just going to thread the bolt though from the underside. fence on wing nut it doesn’t have to be super tight just so it sits there firmly not to mount the router were just going to drop the screw into the hole.
i have just used the original screws from the router base plate and made a really deep hole with the Forstner bit ideally you would probably want to to get some longer bolts.
And that’s it simple as I’ve got my adjustable fence the router is mounted to the bottom now to use all you can do is clamp it to the bench or you can clamp it to a couple of saw horses and take it out on site for this one i will clamp it straight on to the bench here. 2 clamps should be enough normally and then to set the fence all we do is bang a clamp on there and then we just run whatever we want along there you know cut a dado a dado with that this ones even adjustable. so i can wind my router bit up and down quiet easily without having to fiddle around underneath all done and that will work pretty well.
Okay lets give it a quick test out just got a simple cut setup here just dado on this little piece of wood so we will pop our safety equipment on and give it a cut
now you can do a few little modifications to this thing to make it work a little bit better for you you can do a bigger fence nothing hard there just a couple of right angle with some reinforcing on the side so if you want a bit of height another thing i used to do is i have this little device so if I’m cutting finger joints you can see where i have plowed through already and then i can just run it through adjust the fence move it over and that used to work pretty well for me.
bada boom bada bing you can make this for under $10 in 10 or 15 minutes i hope you like this quick little project and go and make it now you have go no excuse not to make that laptop table we made last week so click here to go and check out that video or if you learn how to make a wood workbench with a Kreg HD pocket jig click here i hope we have done enough to get your subscription so check out those videos and then go do something. shoo why are you still here go cut something go cut something some wood not yourself.
——————-
Shop for MicroJig, Musclechuck and other woodworking tools here:
www.onewood.com.au
——————-
Follow Me:
Facebook: www.facebook.com/onewoodtools
Google+: https://plus.google.com/+OneWoodAuwoodworking
Twitter: https://twitter.com/onewoodtools
Linkedin: https://www.linkedin.com/company/one-wood-tools