Factory making 3-PCS Locking Pliers Sets surface by Electrophoresis Export to Singapore
Short Description:
Product Detail
Product Tags
To be the stage of realizing dreams of our employees! To build a happier, more united and more professional team! To reach a mutual benefit of our customers, suppliers, the society and ourselves for Factory making 3-PCS Locking Pliers Sets surface by Electrophoresis Export to Singapore, We fully welcome customers from all over the world to establish stable and mutually beneficial business relationships, to have a bright future together.
Basic Information
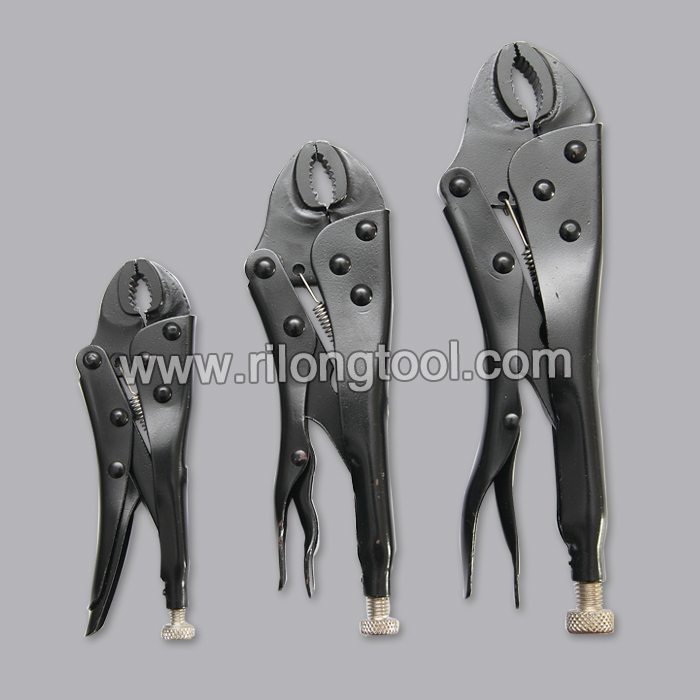
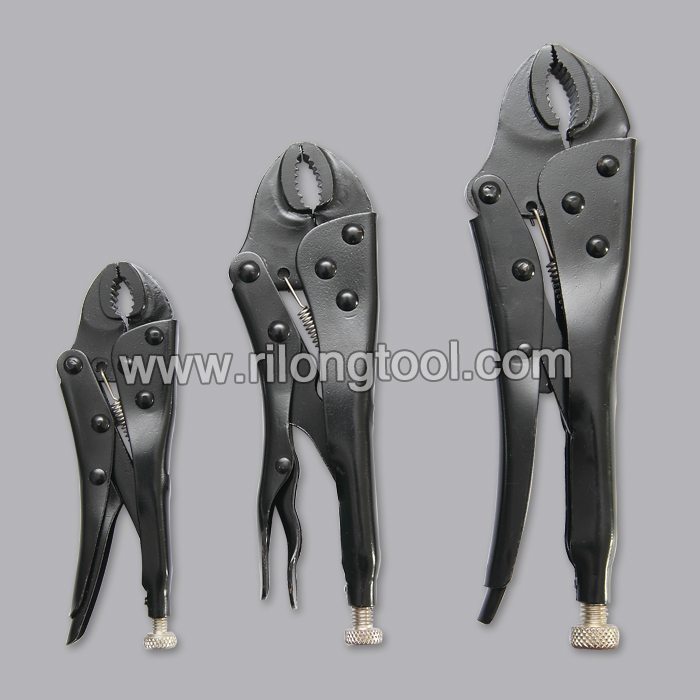
■Model Number: RL-DLQ023
Additional Information
■Material: A3# steel (Q235) or 45# steel
■Size: 5”, 7″, 10″
■Surface Treatment: Electrophoresis
■Heat Treatment: Optional
■Package: Blister Card, Suction Card, Double Blister Card
■OEM: Acceptable
■HS Code: 8203200000
■Samples: For FREE
■Delivery Time: Always 30 working days depending on the order quantity
■Packing: By standard cartons
Product Description
■Mainly used for clamping parts to rivet, weld, grind and so on, which is characterized by the powerful clamp force produced by the jaw. It can lock tight so that the parts won’t fetch away. Besides, jaws have a lot of levels to adjust for the use of different thickness of parts, and it also can be used as a wrench.
■Flexible using, long life and good tenacity.
■The screw tuning button can give the best clamp size easily.
Product Image
This video from Sears PartsDirect shows how to replace a broken drain pump in a front-load washer. The drain pump removes water from the washer during the drain cycle. If you washer won’t drain, you can replace the drain pump using the steps in this video.
Visit us at:
https://www.searspartsdirect.com?sid=soc:youtube:replacing-the-drain-pump-on-a-front-Load-washer
Or call 1-800-437-1673 to speak with a parts specialist.
The video includes these parts. Look up your model to make sure you get the right parts for your washer.
Drain Pump
https://www.searspartsdirect.com/part-number/4681EA2001T/0026/795.html?sid=soc:youtube:direct-part-link
Find parts for your washer at:
https://www.searspartsdirect.com/partsdirect/product-types/Washer-Parts?sid=soc:youtube:washer-part
Or click here to schedule an appointment with a repair technician. https://www.searshomeservices.com/repair#showall
Transcript:
Unplug the power cord from the wall outlet. Using a Phillips screwdriver, remove the 2 screws on the back of the washer that secure the top panel. Gently pull the top panel toward the back of the washer and lift it up and off. Using a Phillips screwdriver, remove the screw on the back of the control panel. The screw is on the right side as you face the front of the washer. Release the locking tab at the back of the dispenser drawer and then pull it completely out of the dispenser housing. Using a Phillips screwdriver, remove the screws on each side of the dispenser housing. Unplug the wire harness connections for the control panel by pressing on the release tabs and sliding the connectors apart. Stand in front of the washer and lift up on the control panel to release the top. Pull the control panel off the washer. Open the drain pump filter cover at the bottom of the washer front panel. Remove the screws that secure the plastic pump housing to the frame of the washer. Remove the plastic pump housing. Use a Phillips screwdriver to remove the mounting screw from the bottom of the front panel. Use the outer spring pliers to expand the spring clamp and remove it from the door boot. Release the rubber door boot from the lip around the opening to the washer tub on the front panel. Remove all of the screws from the top of the front panel. Close the washer door. Tip the top of the front panel out and disconnect the wire harness from the door lock assembly. Pull the front panel off the washer. Place a shallow drain pan in front of the washer. Remove the plug from the small drain hose on the pump body to drain any water remaining in the pump body and washer tub. Reinstall the small drain hose plug and move the drain pan out of the way after draining the water. Place a towel under the pump body hoses to catch water that may spill out when you disconnect them. Use pliers to release the spring clamp and pull the drain hose off the pump body. Repeat the process to pull the recirculation hoses off the pump body. Release the spring clamp and remove the tub-to-pump hose from the pump body. Pull the wire harness connections off the drain pump and recirculation pump. Release the wires from the tiebacks on the drain pump. Remove the bolts that secure the drain pump to the washer base. Remove the pump body and set it on a work surface. Don’t forget to remove the towel from the washer. Remove the drain pump mounting screws and pull the drain pump out of the pump body. Insert the new drain pump into the pump body and reinstall the mounting screws. Reinstall the pump body in the washer base and secure it with the mounting bolts. Reconnect the wires to the new drain pump and the recirculation pump. Route the wires through the tiebacks on the drain pump. Reconnect the tub-to-pump hose and secure it with the spring clamp. Reconnect the recirculation hoses on the pump body and secure them with the hose clamps. Reconnect the drain hose to the pump body and secure it with the hose clamp. Put the front panel in position and reconnect the wire harness. Lift the front panel onto the frame and line up the mounting screw holes at the top. Insert the mounting screws at the top of the front panel and tighten them firmly. Position the door boot around the lip of the opening in the front door panel. Secure the door boot with the spring clamp. Insert the screw into the bottom base of the washer in the opening for the pump housing and tighten it. Push the drain pump filter housing into the front panel recess. Reinstall the mounting screws and tighten them firmly. Close the drain pump filter housing door. Position the control panel on the top of the front panel. Reinstall the screws in the dispenser housing. Reinstall the screw on the back right side of the control panel. Plug in the wire harness connections for the control panel. Push the detergent dispenser back into the drawer housing. Push the panel down and forward to seat it on the washer frame. Reinstall the screws to secure it in place. Avoid overtightening. Plug the washer into the electrical outlet.
Please read the description below for a few extra tips.
This short video presents step by step a way to replace the thermostat in Volvo models from around 2003 to 2007 (S60 and V70 with the 2.4 non turbo engine).
The replacement part used in this video is a Beck/Arnley #143-0850 about $100 off Ebay.
On a russian forum, a member has reported having successfully installed a Gates TH35991 thermostat in a 2008 2.5T Volvo XC90, after swapping the gasket from the original thermostat. This might work on a 2.4 engine but hasn’t been tested yet.
See this link https://clubvolvo.ru/showthread.php?t=…
The idea is to get easy access to the thermostat housing. Instead of replacing the whole casing, I only removed the upper half casing, the removed the old thermostat from inside, and replaced it with the new thermostat. I did use the new upper half housing with the new thermostat, as well as the new gasket between the two housing parts.
I did not replace the whole housing, because the rear bolts to the engine block were hard to access. Instead, I removed the two torx screws that keep the two half parts of the thermostat housing together. Note that those screws have Loctite on them and may be very hard to remove. They were hard to remove even from the new thermostat housing. If they don’t move, or if you happen to strip the head, try moving them with a vise-grip (locking pliers). Some people had luck using an universal joint 1/4″ socket adapter to reach the torx bolts without removing the power steering pump.
The coolant bleeder under the radiator is a sensitive plastic piece, don’t force on it, or it may break. Only tighten it gently back by hand using a torx socket with extension until it feels just a bit tight, say much like your home faucet handle. If you can’t release the bleeder just disconnect the upper radiator hose and drain all the coolant from the thermostat (you may cover the alternator with a plastic so it doesn’t get wet).
When refilling the coolant, let the engine run until it gets hot to bleed all the air in the system while constantly monitoring and topping up the coolant reservoir. The level needs to be topped again the next morning when the engine is completely cold.
Checking for a stuck open thermostat
Usually the thermostat will fail open position because the sliding pin inside the t-stat corrodes and gets stuck. The symptoms for a stuck t-stat is the engine will take longer to get the temp needle at 12h in cold weather, and the cabin heater won’t blow hot air except after hard acceleration. To check for a stuck open t-stat start the engine from cold, let it idle 2 minutes then touch in the middle the upper thick radiator hose that goes between the stat housing and the radiator. If it’s warm it means the stat is stuck open and needs replaced.
Volvo forums
https://matthewsvolvosite.com/
https://volvoforums.org.uk/