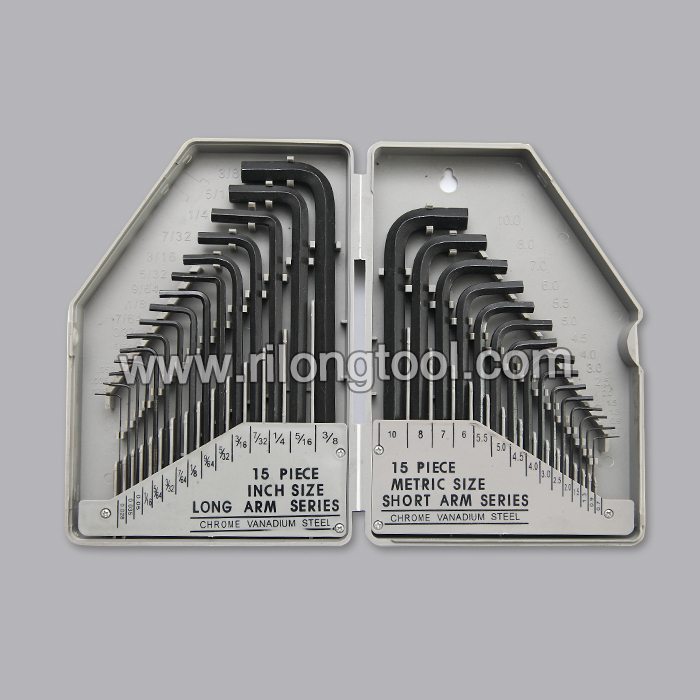
9 Years Factory 14-PCS Hex Key Sets packaged by spring ring Moldova Manufacturers
Short Description:
Product Detail
Product Tags
To meet the customers' over-expected satisfaction , we have our strong team to provide our best overall service which includes marketing, sales, designing, production, quality controlling, packing, warehousing and logistics for 9 Years Factory 14-PCS Hex Key Sets packaged by spring ring Moldova Manufacturers, sincerely look forward to serving you in the near future. You are sincerely welcome to visit our company to talk business face to face with each other and establish long-term co-operation with us!
Basic Information
■Model Number: RL-NLJ003A
Additional Information
■Material: 45# Carbon Steel
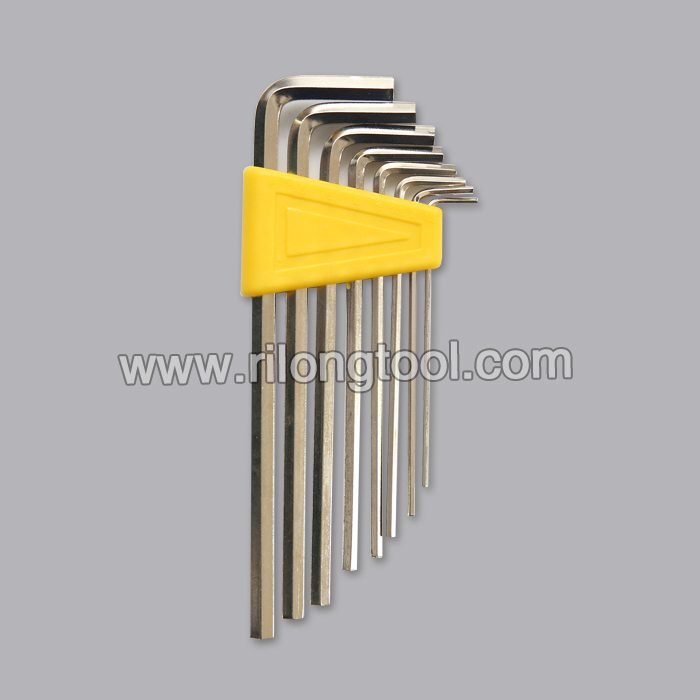
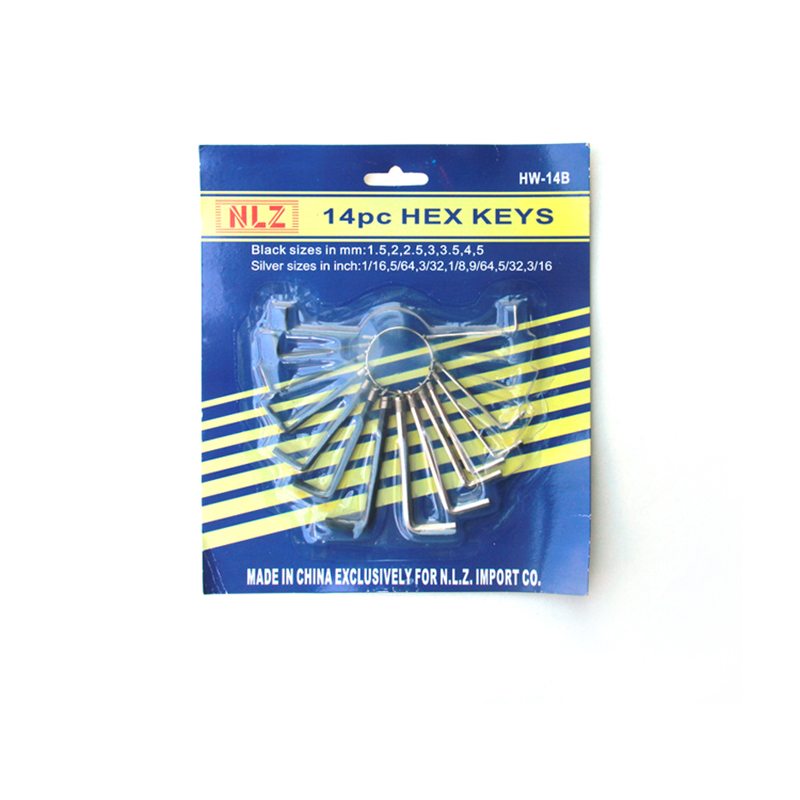
■Size: 1/16″-3/8″, 1.5mm-10mm
■Surface Treatment: Zinc-plated + Black Oxide
■Heat Treatment: Optional
■Package: Spring Ring + Suction Card
■OEM: Acceptable
■HS Code: 8204110000
■Samples: For FREE
■Delivery Time: Always 30 working days depending on the order quantity
■Packing: By standard cartons
Product Description
■Ningbo Rilong Hardware Tools Factory can provide various kinds of Hex Key with different sizes and packages.
Product Image
Justin from MAHLE Motorsports goes over different methods of installing round wire locks, or circlips, on your pistons.
https://www.ereplacementparts.com/blade-assembly-p-282695.html Click here for more information on this part, installation instructions and more.
This particular blade assembly is specific to Ryobi manufactured brands, including Ryobi, Troy-Bilt, Yard Man, and Bolens. To find a blade assembly specific to your model, visit eReplacementParts.com.
If your string trimmer is showing any of these symptoms; replacing the blade assembly could solve your problem:
1) Trimmer line is damaging the guard
2) Too much line coming out of trimmer head
3) Engine bogging down
4) Engine overheating
5) Blade is damaged (not cutting line properly)
6) Blade is missing or lost
eReplacementParts.com part number: 791-682061
Tools used for this repair/replacement:
1) Drill & assorted drill bits
2) Center-punch
3) Hammer
4) Long-nosed pliers
5) Wrench or socket set
6) Phillip’s screwdriver
Get model-specific repair help from eReplacementParts.com. Learn how to troubleshoot, diagnose and repair your power tools and equipment with illustrated instructions, hundreds of step-by-step repair videos, and our DIY forum. If you have a power tool or appliance problem, we can help. https://www.ereplacementparts.com/articles-c-8873.html
[ VIDEO TRANSCRIPT ]
Hi, I’m Mark from eReplacementParts.com. In this video I’m going to show you how to replace the blade assembly on a Ryobi trimmer. The blade assembly mounts to the cutter-head guard on your trimmer. Its purpose is to cut the trimmer line to the proper length. If the guard is very dull or missing, the trimmer line will actually begin to damage the plastic cutter-head guard. Replacing the blade assembly is easy to do and I’m going to show you how. The blade assembly, as well as many other parts, can be found on our website. Let’s get started.
We’ll begin by removing the old blade from the guard. You’ll notice that, from the factory, the blade is riveted to the guard. The new blade kit includes screws and nuts to secure it, so to remove the old blade, we need to drill out these rivets. I’ll start with a center punch. And I just want to punch a starter location for my drill bit. With the rivets dimpled, now we use a drill and a drill bit to drill out the head of the rivet.
Now, I’m going to switch to a larger drill bit to finish the rivets off. Now, I’ll push the rivets through the plastic guard. Now, I’ll install the new blade. I’ll install it with the bevel facing the trimmer head, then I’ll insert the screws through the blade. I want the screws to come from the inside, or the side closest to the trimmer head, so that it’s fairly flush. Then, I’ll install the lock nuts on the opposite side. Now, I’ll tighten up the lock nuts using a screwdriver and a socket wrench.
And that’s all it takes to replace the blade assembly on your Ryobi trimmer. If you found this video helpful, be sure to give us a thumbs-up, and leave a comment.
[ END TRANSCRIPT ]