5 Years manufacturer 6.5″ Forehand Long-nose Locking Pliers to Czech Republic Factory

Short Description:
Product Detail
Product Tags
We have a highly efficient team to deal with inquiries from customers. Our goal is "100% customer satisfaction by our product quality, price & our team service" and enjoy a good reputation among clients. With many factories, we can provide a wide range of 5 Years manufacturer 6.5″ Forehand Long-nose Locking Pliers to Czech Republic Factory, We welcome new and old customers from all walks of life to contact us for future business relationships and achieving mutual success!
Basic Information
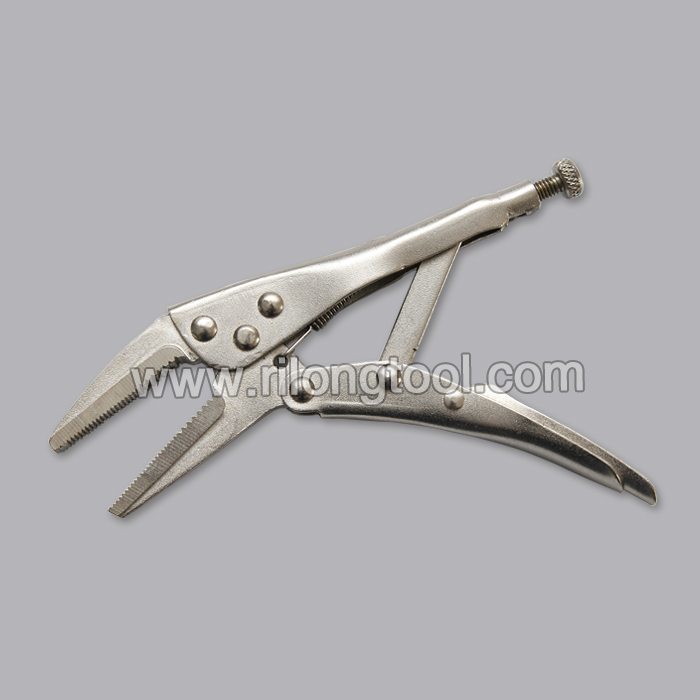
■Model Number: RL-DLQ007
Additional Information
■Material: A3# steel (Q235) or 45# steel
■Size: 6.5”
■Surface Treatment: Nickel-plated, Zinc-plated, Black Oxide, Electrophoresis
■Heat Treatment: Optional
■Package: Blister Card, Suction Card, Tie Card, Double Blister Card
■OEM: Acceptable
■HS Code: 8203200000
■Samples: For FREE
■Delivery Time: Always 30 working days depending on the order quantity
■Packing: By standard cartons
Product Description
■Mainly used for clamping parts to rivet, weld, grind and so on, which is characterized by the powerful clamp force produced by the jaw. It can lock tight so that the parts won’t fetch away. Besides, jaws have a lot of levels to adjust for the use of different thickness of parts, and it also can be used as a wrench.
■Flexible using, long life and good tenacity.
■The screw tuning button can give the best clamp size easily.
Product Image
Is your shower arm worn out or broken, the finish doesn’t match your other fixtures, or you just want a new style? Watch as our go-to guy, Mike, shows you how to remove your old shower arm and install a brand new one. He’ll cover tips for getting your shower arm out of the wall without breaking anything and what to do if the arm does get broken, as well as the easiest way to ensure your new shower arm is properly installed and won’t leak.
Kung Fu Maintenance demonstrates how to repair a refrigerator compressor that suddenly stopped working or will not run. Nice Little Hand Held Drill https://amzn.to/2lixPwx
Get the Screwdriver used in so many KFM videos here https://amzn.to/2kHFoOF
Get the Multi Tool Pliers used in so many KFM videos https://amzn.to/2kWTjPp
Get KFM’s Favored Cordless Drill Plus Power Tool Set https://amzn.to/2lie9cb
Get the Wet Dry Vacuum used in so many KFM videos https://amzn.to/2lFxi7u
Get The Kung Fu Maintenance book here https://amzn.to/2lEQPFk
Or the Kung Fu Maintenance E book here for less than $5 https://amzn.to/2lEY8wD
Get the Kung Fu Maintenance album (good driving music) “Up Beat” here https://amzn.to/2l41pZ1
Get the Kung Fu Maintenance album (nice Instrumental music) “Entropy” here https://amzn.to/2kl2U0p
I don’t work for any of the product companies listed however I do make a small commission on items ordered through the links.
https://KungFuMaintenance.Com
https://Blog.KungFuMaintenance.Com
https://Arcade.KungFuMaintenance.Com https://VGBlog.KungFuMaintenance.Com
https://TheMaintenanceEar.KungFuMaintenance.Com
All right, what I’ve got here is a fridge with a compressor that won’t start. Plug it in, we should hear the compressor kick on, but it’s not. Unplug it. Always want to unplug these before moving these covers.
Install the starter pack here. Each fridge is a little bit different, and there’s a couple different models. A couple different starter packs for different horsepower ratings.
It seems pretty dusty. I’ll blow this thing out when I’m finished. Here we go. There’s our clip. Gives us access to the compressor wiring.
Let’s just take all this part out. May have to bend this up that way just a little bit here. There’s our lines in. And then what you do is remove this. It should slide right out. I have to ease this thing. There we go.
That gives us access to the three prongs there. It’s just like an air conditioner. You got to start, common, and then run. Your white, usually the back one, that’s your start. And then the red is your run. And the black is your common. Common’s always on the top. Common’s usually on the top.
We don’t want anything touching here, any of these touching. So I just kind of bend the other way. Then these, you strip them off and connect one to each lead on your 3n’1 Start here, start pack for a fridge here. Now grab some wire strippers. You always want to use wire strippers for stripping wires down.
Looks like I need it to be a little bit longer than that. There we go. Twist the end. And attach your wire nuts. Actually, they’re called wire connectors now. They used to be called wire nuts years ago, but for some reason they’ve changed the name to wire connectors.
And then we’re going to need to mount this inside. So it doesn’t fall on anything. Turn this back. And we’re ready to start it up. See if she works. Plug it in. Oh yeah. Fired right up. That’s what it was. You know, the capacitor went bad already and it’s hard to start, but the starter pack started it right up.
Now then, take a wet/dry vacuum, convert it to a blower, and blow all this stuff out. Blow all the coils off. That’ll keep it going for a while. Good to go.