2017 wholesale price 10″ Forehand Round-Jaw Locking Pliers for Ukraine Manufacturer
Short Description:
Product Detail
Product Tags
Well-run equipment, professional sales team, and better after-sales services; We are also a unified big family, everyone stick to the company value "unification, dedication, tolerance" for 2017 wholesale price 10″ Forehand Round-Jaw Locking Pliers for Ukraine Manufacturer, We sincerely welcome domestic and foreign merchants who calls, letters asking, or to plants to negotiate, we will offer you quality products and the most enthusiastic service,We look forward to your visit and your cooperation.
Basic Information
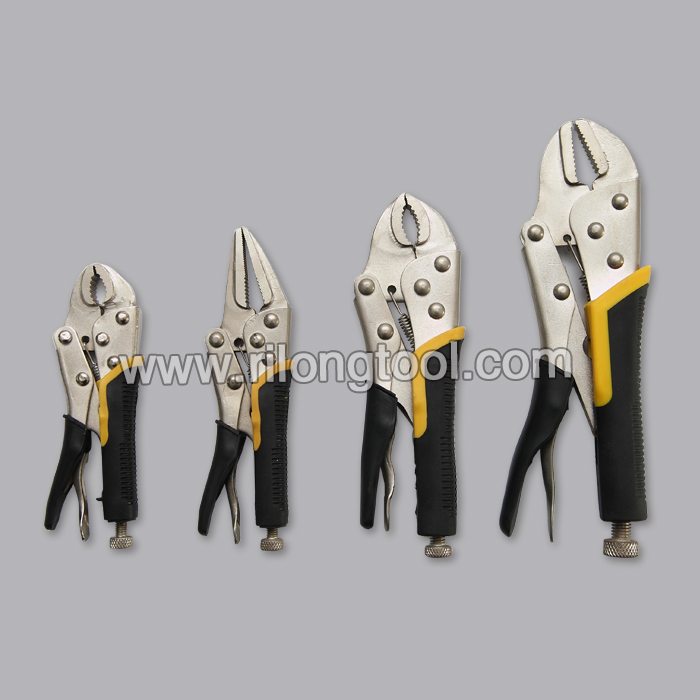
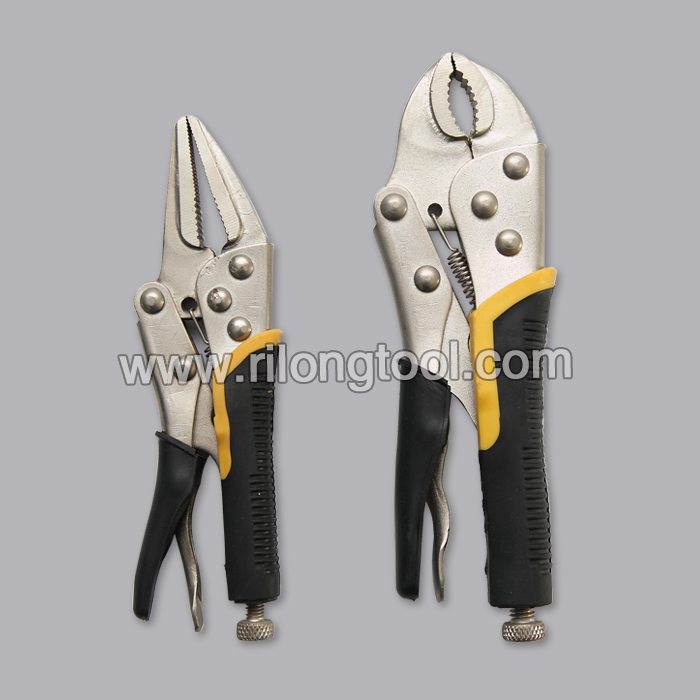
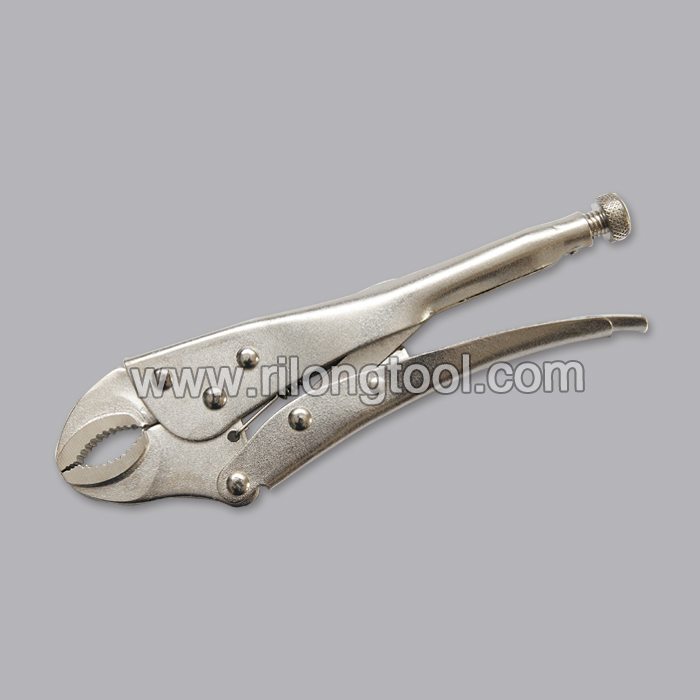
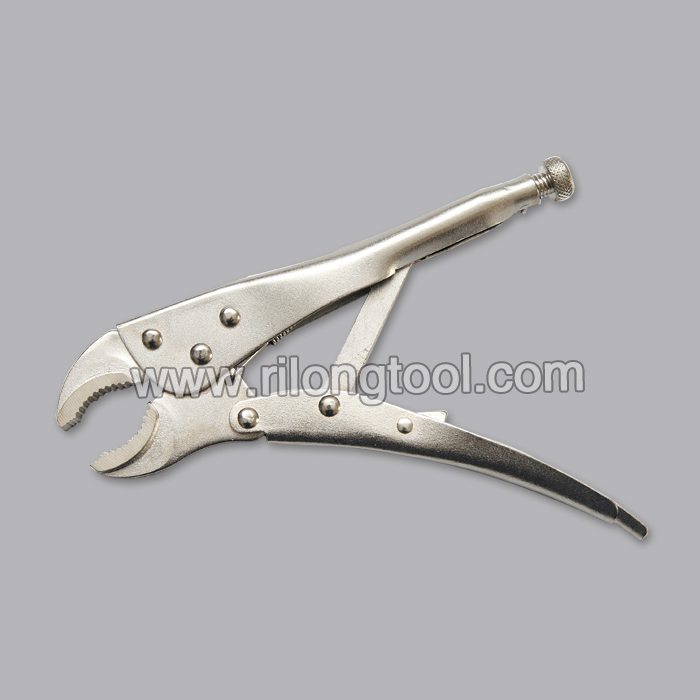
■Model Number: RL-DLQ005
Additional Information
■Material: A3# steel (Q235) or 45# steel
■Size: 10”
■Surface Treatment: Nickel-plated, Zinc-plated, Black Oxide, Electrophoresis
■Heat Treatment: Optional
■Package: Blister Card, Suction Card, Tie Card, Double Blister Card
■OEM: Acceptable
■HS Code: 8203200000
■Samples: For FREE
■Delivery Time: Always 30 working days depending on the order quantity
■Packing: By standard cartons
Product Description
■Mainly used for clamping parts to rivet, weld, grind and so on, which is characterized by the powerful clamp force produced by the jaw. It can lock tight so that the parts won’t fetch away. Besides, jaws have a lot of levels to adjust for the use of different thickness of parts, and it also can be used as a wrench.
■Flexible using, long life and good tenacity.
■The screw tuning button can give the best clamp size easily.
Product Image
Click to Buy: https://ajkerdeal.com/Category/Household-Tools-Machineries-Multi-function-Tool
Multi Purpose Pliers in Bangladesh | Multi Function Tools for Everyday Work | Ajkerdeal
9 in 1 Multi Function Plus Tool.
Material: Stainless steel
Sharp edge
Easy to cut.
https://www.ereplacementparts.com/piston-and-rod-assembly-p-282359.html Click here for more information on this part, installation instructions and more.
This particular piston and rod assembly is specific to Ryobi manufactured brands, including Ryobi, Troy-Bilt, and Bolens. To find a piston and rod assembly specific to your model, visit eReplacementParts.com.
If your string trimmer is showing any of these symptoms; replacing the piston and rod assembly could solve your problem:
1) Low compression
2) Damage to connecting rod or bearing
3) Engine not turning over
4) Engine seizure
5) Loss of power
6) Smoke coming from engine
eReplacementParts.com part number: 753-04367
Tools used for this repair/replacement:
1) Receptacle for draining fuel
2) Phillip’s screwdriver
3) Ratchet and socket set
4) Torx wrenches
5) Starter rope (or similar object) for binding engine
6) Spark plug wrench or socket
7) Adjustable wrench
8) Long-nosed pliers
9) Rubber mallet
10) Standard screwdriver
11) 2-cycle oil (for lubricating piston and cylinder)
12) Razor blade (to scrape gasket surface)
Get model-specific repair help from eReplacementParts.com. Learn how to troubleshoot, diagnose and repair your power tools and equipment with illustrated instructions, hundreds of step-by-step repair videos, and our DIY forum. If you have a power tool or appliance problem, we can help. https://www.ereplacementparts.com/articles-c-8873.html
[ VIDEO TRANSCRIPT ]
Hi, I’m Mark from eReplacementParts.com. In this video I’m going to show you how to replace the piston in a Ryobi trimmer. The piston is a central component of your trimmer’s engine. It both provides compression within the engine, as well as transfers the energy from combustion to the crankshaft, which creates rotation.
The piston assembly is made up of the piston itself, the piston rings, the connecting rod, and the connecting rod bearing. The most common reason you need to replace the piston would be worn rings. If you need to replace the piston, it’s not uncommon to also have to replace the cylinder, as the two work together. Replacing the piston isn’t the easiest repair, but it’s something you can do yourself if you follow our instructions. Pistons, as well as many other parts, can be found on our website.
Let’s get started. I’ll begin by removing the rear cover. Now remove the two screws that secure the carburetor to the engine. Before removing any of the fuel lines from the carburetor or the lines from the tank, you will want to make sure that you drain any gas that might still be in the fuel tank. Now I can pull the carburetor away, disconnect the throttle cable and remove the fuel lines.
Now remove the muffler. It’s held in place with two screws. Now remove the carburetor mounting plate. It’s held in place with four screws. I’ll also need to thread the throttle cable through the opening in the mounting plate. As I take this assembly apart, the fuel lines and fuel tank will also come with it. Now remove the clutch housing and the shaft from the rest of the engine. It’s secured with four screws.
Now remove the clutch drum and the clutch. Before I do that though, I need to bind up the piston. If I don’t bind the piston, when I go to remove the screw that secures the clutch drum and the clutch itself, the crankshaft will simply rotate and I won’t be able to free them. I’ll remove the spark plug boot and then the spark plug. Now to bind the piston, I’ll insert a piece of starter rope into the cylinder. The starter rope will coil up and take up all that space inside the combustion chamber, so that the piston won’t have any travel, and the crankshaft won’t be able to rotate.
Now that the piston is bound, I can remove the clutch drum and the clutch. Now I can remove the starter assembly. As I pull the starter away, there’s a wire that leads to the ignition coil. I’ll need to remove that. Now I’ll remove the flywheel, and the flywheel is secured to the shaft by means of a taper. There’s a spacer on the crankshaft, I’ll pull that away. To remove it, I’ll lift up the engine just slightly by the flywheel, and I’ll strike the motor shaft with a rubber mallet.
Beneath the flywheel there’s woodruff key that indexes the flywheel to the crankshaft, and I’ll remove that key. Now I’ll separate the cylinder from the crankcase. It’s secured with two screws.
[ Download a .pdf of the entire transcript here: https://www.ereplacementparts.com/blog/wp-content/uploads/2015/10/Transcript_Piston_Ryobi_Trimmer.pdf ]