14 Years Factory wholesale 10-PCS Hex Key Sets packaged by spring ring for Irish Importers

Short Description:
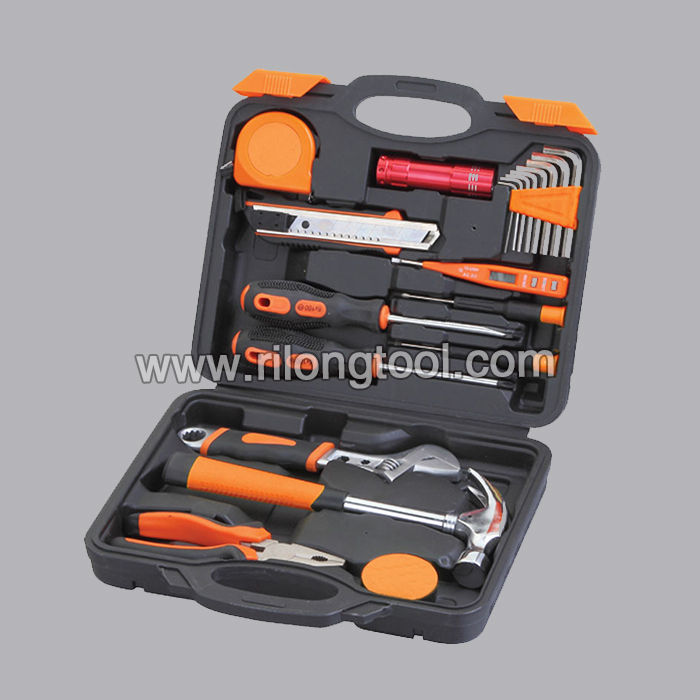
Product Detail
Product Tags
"Quality first, Honesty as base, Sincere service and mutual profit" is our idea, in order to develop continuously and pursue the excellence for 14 Years Factory wholesale 10-PCS Hex Key Sets packaged by spring ring for Irish Importers, Let's cooperate hand in hand to jointly make a beautiful future. We sincerely welcome you to visit our company or contact us for cooperation!
Basic Information
■Model Number: RL-NLJ004A
Additional Information
■Material: 45# Carbon Steel
■Size: 1/16″-3/8″, 1.5mm-10mm
■Surface Treatment: Black Oxide
■Heat Treatment: Optional
■Package: Spring Ring + Suction Card
■OEM: Acceptable
■HS Code: 8204110000
■Samples: For FREE
■Delivery Time: Always 30 working days depending on the order quantity
■Packing: By standard cartons
Product Description
■Ningbo Rilong Hardware Tools Factory can provide various kinds of Hex Key with different sizes and packages.
Product Image
How to hand bend metal Hearts!!!
***Sorry about the quality of the video – This is my first ever attempt and will know better next time. I hope it is still useful to people***
How to mod a G29 for a handbrake by tapping into the printed circuit board on the wheel and running wires through the neck and out the front of the base.
Also repairing the design flaw of the G29 where Logitech has the flimsiest wires from the wiring harness to an 8 pin connector which then connects to the PCB on the wheel. These tiny wires then twist every time the wheel rotates, causing them to wear and snap from the inside. **this info was prominent on the Logitech forums until they changed them so that you can no longer find anything!***
TO MAKE MY DIY HANDBRAKE (as seen at the end of the video)
***Sorry I didn’t take pics/video of this process but the idea of a guide didn’t occur to me until after it was finished (& I’m not about to pull it apart)***
Tools and supplies needed:
*Measuring ruler/tape
*A vice, hammer and angle grinder (to bend, shape and cut the metal bracket).
*Drill (for mounting the switch onto the bracket, the bracket to your handbrake – to your frame/cockpit).
*Small gauge wire long enough to reach from the wires protruding from your G29 to where your handbrake will be mounted.
*Soldering iron with solder plus heatshrink and wire cutters/strippers.
*This handbrake (basically the cheapest available from China): https://www.ebay.com.au/itm/NEW-HYDRAULIC-DRIFTER-DRIFT-E-BRAKE-EBRAKE-HANDBRAKE-BRAKE-LEVER-GRIP-/251900405088?hash=item3aa66f2560:g:QngAAOSweW5VG7CT
* Metal sheeting from your local hardware – thin enough for you to bash into right angles with a hammer in the vice.
*A momentary switch that takes 2 wires (a button that will activate when it is pressed in and will then turn off automatically when it is released) – just ask at your local electronic parts store (I didn’t buy mine online and thus have no link).
*Black spray can to make your metal bracket pretty (I also painted my red switch button black). I used auto acrylic gloss as it dries quickly and adheres fairly well to a scuffed, clean surface.
*Various Nuts and bolts to mount eveything (I used stainless steel M6 threads but whatever works).
*A male and female connector that take 2 wires (if you want to ever be able to detach the handbrake from your G29)
Basic instructions
1. Get Your handbrake 1st – no point gathering the other parts until you can see the approx sizes you’ll need – then collect the other parts.
2. Approximately fit the h/brake into position and measure/mark where you will need to drill your mounting holes from the h/b to your cockpit.
3.Take your switch to the h/b and fit by eye below the handle so you can see where the button must be mounted when you fully pull the handle of the h/b down.
4.With your basic idea, take your sheet metal to the h/b to visualise the approx shape that you will need it bent and cut to in order to mount your button.
5. Now get to work at your vice with the metal and hammer, grinder until you have the right shape and cut down as you need until you are happy with it. – Keep fitting by eye until you’re sure that you could mount the button onto it (don’t drill any mounting holes for the button or bolts until you’re confident it will work).
6. After you’ve finished with the bracket, mount it with the button on it and confirm that it works as intended, then dismantle it and paint parts as desired (I’m sure you can figure out the painting on your own).
7. Solder your 2 wires to the switch (one onto each point on the switch). Now you can confirm that your switch is okay by connecting the other ends of your wires to the ones out the front of your G29. Then fire up a game and test in the button config. options.
8. After you’re sure it works, mount the male and female connectors to the wires from both the G29 and your handbrake (will likely involve soldering the connectors for durability).
10. Re-assemble, mount and use.