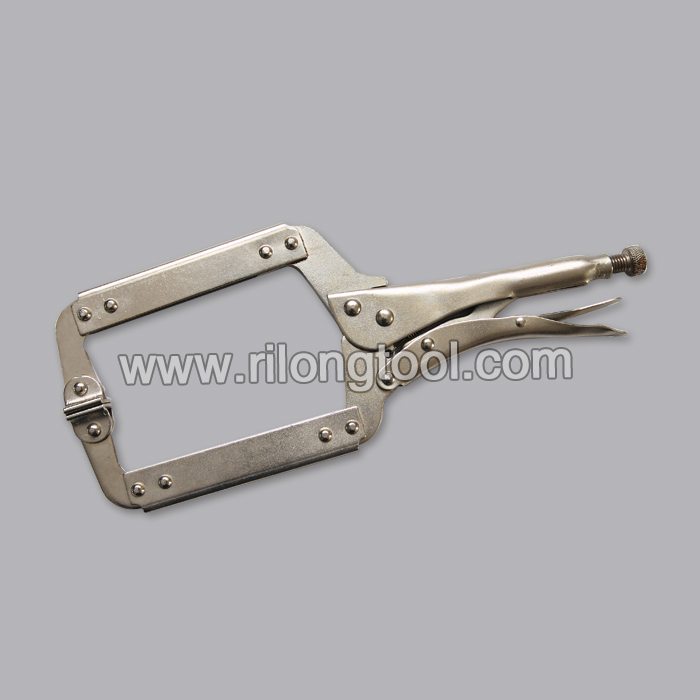
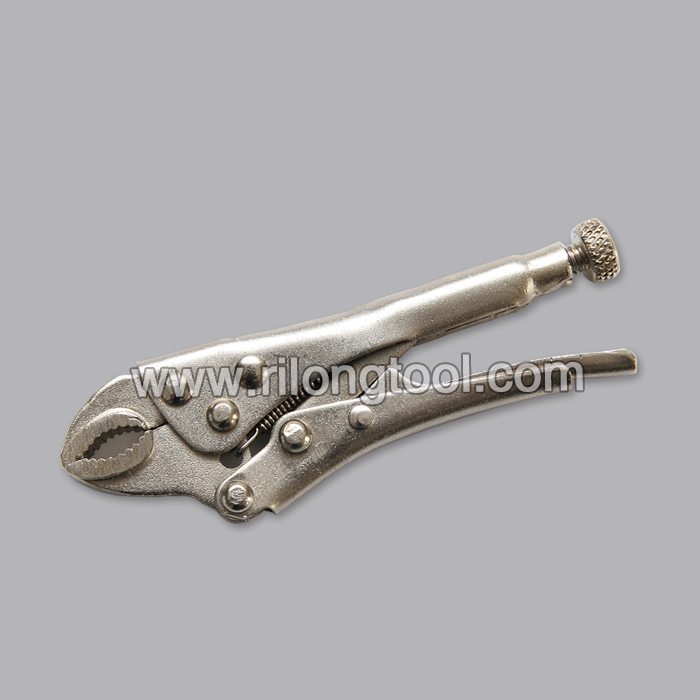
11 Years manufacturer 5″ Forehand Round-Jaw Locking Pliers Factory for Israel

Short Description:
Product Detail
Product Tags
To meet the customers' over-expected satisfaction , we have our strong team to provide our best overall service which includes marketing, sales, designing, production, quality controlling, packing, warehousing and logistics for 11 Years manufacturer 5″ Forehand Round-Jaw Locking Pliers Factory for Israel, We encourage you to make contact as we are looking for partners in our venture. We are sure you will find doing business with us not only fruitful but also profitable. We are ready to serve you with what you require.
Basic Information
■Model Number: RL-DLQ001
Additional Information
■Material: A3# steel (Q235) or 45# steel
■Size: 5”
■Surface Treatment: Nickel-plated, Zinc-plated, Black Oxide, Electrophoresis
■Heat Treatment: Optional
■Package: Blister Card, Suction Card, Tie Card, Double Blister Card
■OEM: Acceptable
■HS Code: 8203200000
■Samples: For FREE
■Delivery Time: Always 30 working days depending on the order quantity
■Packing: By standard cartons
Product Description
■Mainly used for clamping parts to rivet, weld, grind and so on, which is characterized by the powerful clamp force produced by the jaw. It can lock tight so that the parts won’t fetch away. Besides, jaws have a lot of levels to adjust for the use of different thickness of parts, and it also can be used as a wrench.
■Flexible using, long life and good tenacity.
■The screw tuning button can give the best clamp size easily.
Product Image
More info: https://www.parktool.com/product/chain-whip-pliers-cp-1
Secure engagement, easy to use, and fast! The CP-1 quickly grips cogs from 9 to 24 teeth with no manual adjustments. A great shop tool, the CP-1 is 13.7″ (35cm) long and can be used with one hand to hold any 5- to 11-speed cassette solidly during lock ring removal. Forged steel construction with a spring loaded return and comfortable dual density grips.
Related Products:
• SR-1 Sprocket Remover / Chain Whip ▶︎ https://www.parktool.com/product/sprocket-remover-chain-whip-sr-1
• SR-11 Sprocket Remover / Chain Whip ▶︎ https://www.parktool.com/product/sprocket-remover-chain-whip-sr-11
• SR-2.2 Sprocket Remover / Chain Whip ▶︎ https://www.parktool.com/product/sprocket-remover-chain-whip-sr-2-2
➤ Fix It:
Did you know that Park Tool is the #1 resource for bicycle repair education?
• Visit our YouTube Channel: https://www.youtube.com/parktool
• Visit the Repair Help section of Parktool.com: https://www.parktool.com/blog/repair-help/
• Check out The Big Blue Book of Bicycle Repair: https://www.parktool.com/product/big-blue-book-of-bicycle-repair-3rd-edition-bbb-3
➤ About Park Tool:
Park Tool has been manufacturing bicycle specific tools since 1963. Based out of St. Paul Minnesota, we are the world’s largest bicycle tool manufacturer. A long-term dedication to quality, innovation, and customer service has made Park Tool the first choice of professional and home bicycle mechanics around the world.
➤ Subscribe: https://www.youtube.com/user/parktoolcompany?sub_confirmation=1
➤ Like: https://www.facebook.com/parktool
➤ Follow: https://www.instagram.com/parktoolblue
This is an instructional video on the assembly process for the Brodie International (https://www.brodieintl.com) Valve Cylinder Assembly, 2″-4″ valves.
For this project, you’ll need a cylinder, cylinder head, piston, valve spring, seal ring, retaining ring, six retaining head screws, two jack out screws, and five elastomers appropriate for the product.
You’ll also need an Allen wrench, channel lock pliers, a suitable elastomer lubricant, a brush, and an extra set of hands.
Start by placing the elastomer inside the cylinder, making sure that it’s seated properly.
Next, lubricate the elastomer. Insert the seal ring into the cylinder, against the elastomer.
Install the retaining ring over the seal ring.
This process can be challenging, it’s important to get the retaining ring seated in the groove.
After the retaining ring is positioned by hand, use a pair of channel lock pliers to carefully seat the ring tightly in the groove. Try not to mar the outside cylinder finish during this process.
After that’s completed, flip the cylinder over. Fit the elastomer over the piston and lubricate.
Carefully place the piston in the cylinder and push the piston until it stops against the seat o-ring.
Then install the valve spring into the cylinder. It should settle easily in the middle of the piston.
Place the elastomer in the groove on the cylinder head and lubricate.
Place the cylinder head on the cylinder.
Then have an assistant press down on the cylinder head as you align the holes.
Use your Allen wrench to install two cylinder head screws.
Once the two head screws are secured, you can do the rest on your own. Install the remaining cylinder head screws tightly.
Again, flip the cylinder over. Install the two exterior elastomers on the cylinder – both are identical – and lubricate prior to assembly in a valve body.
Finally, locate the holes for the jack out screws and install the jack out screws.
These will aid in the extraction of the cylinder assembly from the valve body if required.
Your assembly is complete.